When you introduce a new feature, you probably notice that your product numbers spike almost immediately. Your signups double, traffic surges, and dashboards start glowing with positive indicators. For a moment, everything points to success.

But after a few weeks, your customers’ enthusiasm fades. Daily active users stagnate. You notice that retention decreases faster than expected.

On top of all that, the majority of new users don’t return after their first engagement. What appeared to be growth is actually something completely different. I’m sure you’ve seen this problem before.

Teams usually link acquisition with progress, assuming that more users equals a stronger product. However, growth by itself is an imperfect indicator. It shows you how many people showed up, not whether they found value or chose to keep using the product.

Understanding where this misconception comes from, and how to remedy it, is critical for anyone looking to create something that’ll last. Keep reading to learn why you should stop paying so much attention to acquisition spikes and what you should be measuring instead.

How teams misread growth metrics

Most product teams rely mainly on acquisition metrics to determine success. These might include signups, app installs, traffic, and campaign conversion rates. They’re simple to assess, explain, and are often linked to growth targets.

At their core, acquisition metrics measure interest rather than outcomes. A signup only indicates that the user was inquisitive enough to try the product. That curiosity could stem from a variety of sources, including marketing initiatives, social chatter, incentives, or even accidental clicks. It may not necessarily indicate a genuine need for the product.

This creates a subtle yet dangerous illusion. When acquisition numbers increase, teams believe that the product is better. In reality, they may just be getting better at catching attention.

A more accurate approach to think about this is to separate intent from value:

  • Acquisition demonstrates intent — Users showing up
  • Retention demonstrates value — Users choosing to stay

If retention doesn’t follow acquisition, then growth fails to result in meaningful progress. Without this distinction, teams risk praising indicators with little impact on long-term success.

What “low-quality growth” actually looks like

Not all growth is equally beneficial to a product’s success. Some users become long-term, engaged customers. Others leave almost as soon as they arrive.


The distinction is in the quality of growth. Low-quality growth can appear powerful on the surface but show flaws when user behavior is examined more thoroughly.

One common trend is high acquisition followed by low activation. Users sign up in significant numbers but don’t perform the crucial actions that establish the product’s value. This usually indicates that either the onboarding process is unclear or that the product doesn’t quickly express why it’s important.

Another pattern is high initial usage followed by a sharp drop-off. Users participate during their first session, usually motivated by curiosity or outside factors, but never return. This indicates that the product failed to provide a compelling reason for continued use.

In certain cases, growth is driven solely by incentives. Referral programs, discounts, and prizes can attract a large number of users, but they’re often driven by the incentive rather than the product itself. When the reward is gone, their engagement fades.

There’s also the issue of shallow engagement. Users may briefly interact with the product by clicking through features or exploring the interface but never use its main functionality. This type of action can exaggerate engagement metrics while obscuring true value.

Vanity metrics vs. product signals

To make sense of growth, you must differentiate between vanity metrics and product signals.

Vanity metrics are data that appear spectacular but provide no insight into whether the product is actually working. This category includes total sign-ups, page views, and number of downloads. These metrics assess visibility and reach, but they don’t disclose whether users find value.

Product signals, on the other hand, are metrics that capture actual user outcomes. They demonstrate if users are engaging actively with the product and whether that engagement is sustained over time.

Activation rate is one of the most important product signals. It calculates the percentage of users who execute a critical activity that reflects the product’s value. If users aren’t activating, that means acquisition isn’t resulting in substantial usage.

Retention is even more important. It tracks whether users return after their first contact. Strong retention suggests that the product is addressing an actual problem. Weak retention indicates that users either didn’t find value or found inadequate value to return.

The key difference between these two categories is simple: Vanity metrics tell you how many people you reached, whereas product signals tell you how many people you actually helped.

Diagnosing the problem: Where growth breaks down

When growth doesn’t translate into retention, the problem is typically with the product experience rather than the acquisition strategy.

One of the most common issues is a slow or delayed “aha moment.” This is the point where users realize the value of the product. If this moment is difficult to achieve or poorly articulated, users are unlikely to stay long enough to experience it.

Incentives may also affect growth. While they can be helpful for short-term acquisition, they usually attract users who are more concerned with the reward than the product itself. This leads to a gap between user behavior and product value.

Finally, effective onboarding is critical. Even if users are a good fit, a complex or stressful onboarding process can keep them from using the product effectively. Retention issues are often disguised as onboarding issues.

What PMs should measure instead

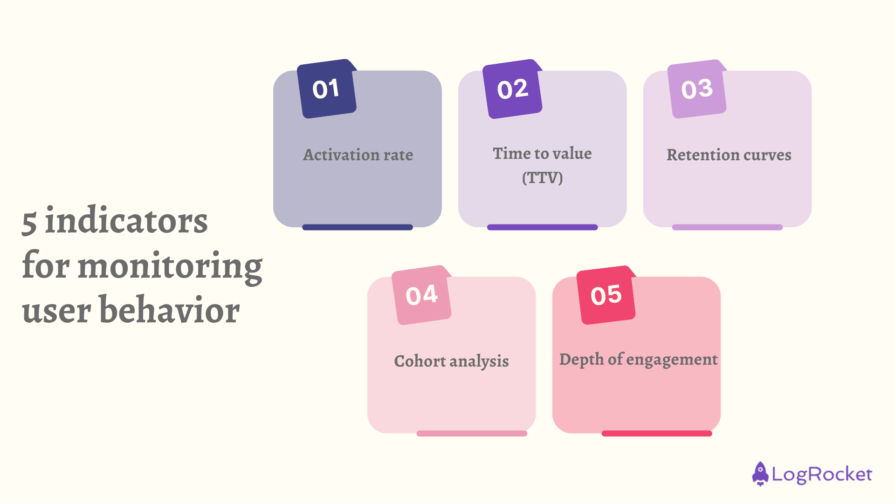
To move beyond misleading growth metrics, you need to prioritize indicators that represent actual user behavior. Here’s the five things I recommend keeping an eye on:

5 Indicators For Monitoring User Behavior

1. Activation rate

This is the basis for product success. If users don’t activate, nothing else matters.

To improve activation:

  • Identify the key action that represents value
  • Remove friction from the onboarding process
  • Guide users toward that action

2. Time to value (TTV)

The faster users experience value, the more likely they are to stay.

Reducing TTV involves:

  • Simplifying onboarding
  • Highlighting key features
  • Removing unnecessary steps

3. Retention curves

Retention curves explain how user engagement varies over time.

A strong product usually has:

  • A steady decline followed by stabilization

A weak product usually shows:

  • A sharp drop-off without any recovery

4. Cohort analysis

Cohort analysis groups users depending on when or how they joined.

This helps answer:

  • What acquisition channels generate the most users?
  • Do specific features increase retention?

5. Depth of engagement

Instead of just measuring activity, measure meaningful activity:

  • Are users taking advantage of core features?
  • Are they finishing important tasks?

A shift from acquisition to retention

Shifting from acquisition-focused to retention-focused thinking necessitates a fundamental shift in how product teams work.


The first stage is to validate the product before scaling growth. If users aren’t activating or retaining, increasing acquisition will only worsen the problem. Growth should occur after, not before, product validation.

Next, growth strategies should be consistent with the product’s primary value. The goal isn’t simply to attract users, but to attract the appropriate users — the ones who’ll gain the most from the product.

The initial user experience should also be properly optimized. Retention can often be determined within the first session, so clarity, simplicity, and immediate value are essential.

Finally, every growth initiative should be assessed based on what happens after signup. It’s not enough to count how many users were acquired. Teams must understand how those users interact, whether they activate or return.

Final thoughts

Growth isn’t necessarily misleading, but it’s often misinterpreted. Acquisition metrics are useful, but they’re just the start of the story.

What happens after the users come determines true product success. You need your users to discover value, return, and make the product part of their habit.

This means shifting the focus of your work from attracting users to retaining them. As a parting piece of advice, remember that long-term growth is based on consistent, compounded value.

Do you have a story of a time you misread an acquisition spike? Let us know in the comments below.

Featured image source: IconScout


LogRocket generates product insights that lead to meaningful action


Plug image


LogRocket identifies friction points in the user experience so you can make informed decisions about product and design changes that must happen to hit your goals.

With LogRocket, you can understand the scope of the issues affecting your product and prioritize the changes that need to be made. LogRocket simplifies workflows by allowing Engineering, Product, UX, and Design teams to work from the same data as you, eliminating any confusion about what needs to be done.


Get your teams on the same page — try LogRocket today.

PakarPBN

A Private Blog Network (PBN) is a collection of websites that are controlled by a single individual or organization and used primarily to build backlinks to a “money site” in order to influence its ranking in search engines such as Google. The core idea behind a PBN is based on the importance of backlinks in Google’s ranking algorithm. Since Google views backlinks as signals of authority and trust, some website owners attempt to artificially create these signals through a controlled network of sites.

In a typical PBN setup, the owner acquires expired or aged domains that already have existing authority, backlinks, and history. These domains are rebuilt with new content and hosted separately, often using different IP addresses, hosting providers, themes, and ownership details to make them appear unrelated. Within the content published on these sites, links are strategically placed that point to the main website the owner wants to rank higher. By doing this, the owner attempts to pass link equity (also known as “link juice”) from the PBN sites to the target website.

The purpose of a PBN is to give the impression that the target website is naturally earning links from multiple independent sources. If done effectively, this can temporarily improve keyword rankings, increase organic visibility, and drive more traffic from search results.

Jasa Backlink

Download Anime Batch

When you introduce a new feature, you probably notice that your product numbers spike almost immediately. Your signups double, traffic surges, and dashboards start glowing with positive indicators. For a moment, everything points to success. But after a few weeks, your customers’ enthusiasm fades. Daily active users stagnate. You notice that retention decreases faster than expected. On top of all

Testing a Nuxt application is not the same as testing plain Vue components. Vue is a frontend framework for building reactive UI components; Nuxt is a full-stack framework built on top of Vue that adds server-side rendering, file-based routing, auto-imports, layouts, middleware, Nitro server routes, and deployment conventions.

That extra framework layer is exactly why Nuxt testing needs its own strategy. A standard Vue unit test can verify a component’s props and rendered output, but it will not automatically reproduce Nuxt behavior like useFetch, NuxtLink, route middleware, or auto-imported composables. For that, you need the right combination of Vitest environments and Nuxt-specific testing utilities.

In this guide, we’ll test a Nuxt application across three tiers:

  • Unit tests for isolated Vue components, composables, and pure logic
  • Nuxt runtime tests for components and pages that depend on Nuxt context
  • End-to-end tests for full app behavior in a real server or browser flow

We’ll use @nuxt/test-utils, @vue/test-utils, @testing-library/vue, Vitest, and Playwright-powered browser utilities. If you are new to mocks, spies, and Vitest’s core APIs, my previous LogRocket guide on advanced Vitest testing and mocking covers those fundamentals in more depth.

Why Nuxt testing needs its own guide

Plain Vue testing libraries like @vue/test-utils and @testing-library/vue work well when you are testing ordinary Vue components. They fall short when the component depends on Nuxt-specific behavior.

Here are a few common examples:

  • Auto-imports: Nuxt makes components and composables globally available, but a standard Vitest setup will not resolve them without Nuxt context
  • useFetch and useAsyncData: These composables are tied to Nuxt’s data-fetching lifecycle and SSR context
  • useRoute, navigateTo, and route middleware: Routing behavior is difficult to reproduce accurately outside a Nuxt runtime
  • Layouts: Testing a page component in isolation skips the layout wrapper and can miss integration bugs
  • Nitro API routes: Server endpoints need a different testing strategy than client-side Vue components

The following diagram shows how Vitest concepts, Vue testing utilities, and Nuxt-specific testing APIs fit together:

Multiple Test APIs Are Required to Ensure Comprehensive Test Coverage
Multiple test APIs are required to ensure comprehensive test coverage

The practical takeaway is simple: use the lightest test environment that still reproduces the behavior you need. Pure Vue behavior can stay in a fast unit test. Nuxt behavior usually needs the nuxt Vitest environment. Full user journeys need e2e coverage.

Companion project and testing environments

This article comes with a companion GitHub project that you can follow along with. It is a Nuxt 4 implementation of the popular TodoMVC app, and its tests live in the test folder.

Although the examples use Nuxt 4, most of the testing ideas also apply to current Nuxt 3 projects that use @nuxt/test-utils. Before copying code into an existing app, check your installed Nuxt and @nuxt/test-utils versions against the official docs because imports and setup details can change between major versions.

The companion project uses three testing tiers. Each tier has a different balance of speed, setup complexity, and confidence:

Test tier Vitest environment Main tools Best for Tradeoff
Unit happy-dom, jsdom, or node Vitest, @testing-library/vue, @vue/test-utils Pure functions, simple components, isolated composables, isolated store logic Fastest, but may miss Nuxt integration bugs
Nuxt runtime / integration nuxt @nuxt/test-utils/runtime, mountSuspended, renderSuspended, registerEndpoint, mockNuxtImport Components or pages that depend on Nuxt routing, auto-imports, modules, useFetch, or middleware More realistic, but more setup
E2E node with @nuxt/test-utils/e2e setup, $fetch, fetch, createPage, Playwright Full flows involving SSR, routing, API handlers, hydration, and browser interaction Highest confidence, but slowest and most brittle

You usually need all three kinds of tests. The goal is not to optimize for one tier, but to choose the lowest tier that gives you enough confidence.

Vitest environments for Nuxt testing

Every test runs in a specific Vitest environment. In a Nuxt app, the environment determines how much of the Nuxt runtime is available:

  • happy-dom or jsdom: Lightweight browser-like environments for unit tests. There is no Nuxt runtime, so you must stub Nuxt-specific APIs like NuxtLink, useRouter, or auto-imported composables yourself.
  • nuxt: Boots a Nuxt runtime inside Vitest. Auto-imports work, Nuxt modules initialize, and @nuxt/test-utils/runtime APIs like registerEndpoint become available. This is useful for integration-style tests that need Nuxt context but not a real browser.
  • node with @nuxt/test-utils/e2e: Starts a real Nuxt server for e2e tests. You can call real server API routes, fetch SSR-rendered HTML, or create a Playwright page for browser interaction.

One important constraint: @nuxt/test-utils/runtime and @nuxt/test-utils/e2e run in different environments, so keep runtime tests and e2e tests in separate files.

Setting up Vitest in a Nuxt project

According to Nuxt’s testing documentation, @nuxt/test-utils ships with optional peer dependencies so you can choose the DOM environment and e2e runner that fit your project. For the examples in this article, install the following packages:

npm i --save-dev @nuxt/test-utils vitest @vue/test-utils @testing-library/vue happy-dom playwright-core

Nuxt’s official setup command includes @nuxt/test-utils, vitest, @vue/test-utils, happy-dom, and playwright-core. We also install @testing-library/vue because several examples below use Testing Library’s render and screen APIs.

Use playwright-core when you want Nuxt test-utils to drive Playwright through its own e2e utilities. If your project uses Playwright’s standalone test runner instead, Nuxt also supports @playwright/test, but that is a separate setup path.

Next, create a Vitest config. The following example organizes tests into unit, nuxt, and e2e projects:

// vitest.config.mts
import vue from '@vitejs/plugin-vue'
import { defineVitestProject } from '@nuxt/test-utils/config'
import { defineConfig } from 'vitest/config'

export default defineConfig({
  test: {
    projects: [
      {
        plugins: [vue()],
        test: {
          name: 'unit',
          include: ['test/unit/**/*.test.ts'],
          environment: 'happy-dom',
        },
      },
      {
        test: {
          name: 'e2e',
          include: ['test/e2e/**/*.test.ts'],
          environment: 'node',
        },
      },
      await defineVitestProject({
        test: {
          name: 'nuxt',
          include: ['app/**/*.test.ts', 'test/nuxt/**/*.test.ts'],
          environment: 'nuxt',
        },
      }),
    ],
  },
})

This is not the only valid structure. You can also colocate test files next to the components they test and route them into the correct Vitest project through file globs. What matters is that tests using Nuxt runtime utilities run in the nuxt environment, while e2e tests using @nuxt/test-utils/e2e run in node.

Tier 1: Unit tests in happy-dom

Most projects should have many unit tests because they are fast, isolated, and easy to run on every code change. Use them for logic that does not require Nuxt context:

  • Pure utility functions
  • Simple presentational components
  • Pure composables
  • Store logic that can be tested without Nuxt plugins

In the companion project, unit tests live in test/unit/ and run in the happy-dom environment. The following Headline.test.ts file renders a simple Vue component without any Nuxt runtime:

import { render, screen } from '@testing-library/vue'
import Headline from '../../app/components/Headline.vue'

describe('Headline', () => {
  it('renders the provided text', () => {
    render(Headline, {
      props: { text: 'todos' },
    })

    expect(screen.getByText('todos')).toBeDefined()
  })
})

This test does not need the nuxt environment because it only verifies that a Vue component renders a prop. There is no NuxtLink, useFetch, auto-imported Nuxt composable, route middleware, or plugin dependency involved.

For more unit testing examples, see my previous guide to Vitest testing and mocking.

Tier 2: Nuxt runtime tests in the nuxt environment

Use the nuxt Vitest environment when the component or page depends on Nuxt-specific behavior. This gives your test access to a Nuxt runtime, including auto-imports, Nuxt modules, routing, and runtime test utilities.

Use mountSuspended for components that need Nuxt context

mountSuspended, provided by @nuxt/test-utils/runtime, wraps mount from @vue/test-utils and mounts a component inside the Nuxt environment. Use it when a component depends on async setup, Nuxt plugins, Nuxt injections, or routing behavior.


The following TodoItem.test.ts example verifies that a todo item renders a NuxtLink to the correct detail route:

import { mountSuspended } from '@nuxt/test-utils/runtime'
import TodoItem from '~/components/TodoItem.vue'

const mockTodo = {
  id: 42,
  label: 'Buy groceries',
  date: '2026-02-13',
  checked: false,
}

describe('TodoItem', () => {
  it('renders a NuxtLink pointing to /todos/:id', async () => {
    const wrapper = await mountSuspended(TodoItem, {
      props: { todo: mockTodo },
    })

    const link = wrapper.findComponent({ name: 'NuxtLink' })
    expect(link.exists()).toBe(true)
    expect(link.props('to')).toBe('/todos/42')
  })
})

You could test this with plain mount, but you would need to wire up the router manually:

it('using mount() requires much more manual setup', () => {
  const router = createRouter({
    history: createMemoryHistory(),
    routes: [
      { path: '/todos/:id', component: { template: '<div />' } },
      { path: '/:pathMatch(.*)*', component: { template: '<div />' } },
    ],
  })

  const wrapper = mount(TodoItem, {
    props: { todo: mockTodo },
    global: { plugins: [router] },
  })

  const link = wrapper.findComponent({ name: 'NuxtLink' })
  expect(link.exists()).toBe(true)
  expect(link.props('to')).toBe('/todos/42')
  expect(link.attributes('href')).toBe('/todos/42')
})

The second test is not wrong, but it obscures the intent. The test is about the component’s route output, not about manually creating a router. mountSuspended keeps the setup closer to how the component actually runs in Nuxt.

Mock Nuxt server routes with registerEndpoint

Nuxt’s data-fetching APIs require a different mocking strategy than ordinary browser fetch calls.

The root page in the demo app fetches todos with useFetch:

const { data } = await useFetch<Todo[]>('/api/todos')

In Nuxt, useFetch and $fetch do not always call the global browser fetch API directly. During SSR, Nuxt can resolve routes like /api/todos through Nitro server handlers, bypassing HTTP. That means mocking global fetch may not affect a useFetch call.

Use registerEndpoint to mock Nuxt server API routes inside the Nuxt runtime:

import { registerEndpoint, renderSuspended } from '@nuxt/test-utils/runtime'
import { screen } from '@testing-library/vue'
import IndexPage from '~/pages/index.vue'

const mockTodos = [
  { id: 1, label: 'Buy groceries', date: '2026-02-11', checked: false },
  { id: 2, label: 'Walk the dog', date: '2026-02-10', checked: true },
  { id: 3, label: 'Write tests', date: '2026-02-09', checked: false },
]

registerEndpoint('/api/todos', () => mockTodos)

describe('Index Page', () => {
  it('renders todos from the mocked /api/todos endpoint', async () => {
    await renderSuspended(IndexPage)

    expect(screen.getByText('Buy groceries')).toBeDefined()
    expect(screen.getByText('Walk the dog')).toBeDefined()
    expect(screen.getByText('Write tests')).toBeDefined()
  })
})

registerEndpoint is an API function, not a macro. The first argument is the route, and the second argument returns the response that the Nuxt data-fetching call should receive.

Because this example uses @testing-library/vue, it uses renderSuspended, which plays the same role as mountSuspended but follows Testing Library’s rendering model.

Stub Nuxt components with mockComponent

Sometimes you want to test a component that renders another nontrivial child component. In the demo app, TodoList renders multiple TodoItem components. To focus the test on the list behavior, we can replace TodoItem with a small stub.

@nuxt/test-utils provides mockComponent for this:

// TodoList.test.ts
import { mockComponent, renderSuspended } from '@nuxt/test-utils/runtime'
import { screen } from '@testing-library/vue'
import { defineComponent, h } from 'vue'
import TodoList from '~/components/TodoList.vue'
import { useTodosStore } from '~/stores/todos'

const mockTodos = [
  { id: 1, label: 'Buy groceries', date: '2026-02-11', checked: false },
  { id: 2, label: 'Walk the dog', date: '2026-02-10', checked: true },
  { id: 3, label: 'Write tests', date: '2026-02-09', checked: false },
]

mockComponent('~/components/TodoItem.vue', () =>
  defineComponent({
    props: { todo: Object },
    setup(props) {
      return () =>
        h('div', {
          'data-testid': 'todo-item-stub',
          'todo-label': props.todo?.label,
        })
    },
  })
)

describe('TodoList', () => {
  it('renders one stub per todo seeded into the store', async () => {
    const store = useTodosStore()
    store.setTodos(mockTodos)

    await renderSuspended(TodoList)

    const stubs = screen.getAllByTestId('todo-item-stub')
    expect(stubs).toMatchSnapshot()
  })
})

The TodoList component reads from the Pinia store, so the test seeds the store before rendering the component.


More great articles from LogRocket:


The render-function version above is explicit, but it can be hard to read. Because the Nuxt test environment includes Vue’s runtime template compiler, you can write the stub more simply with a template:

mockComponent('~/components/TodoItem.vue', {
  props: ['todo'],
  template: '<div data-testid="todo-item-stub" :todo-label="todo?.label" />',
})

One caveat: mockComponent is a macro that is hoisted to the top of the file. In practice, that means it is best for file-level stubs. If you need a different stub per test, use a global stub through @vue/test-utils instead:

// TodoList.globalstub.test.ts
test('renders one stub per todo seeded into the store', async () => {
  const store = useTodosStore()
  store.setTodos(mockTodos)

  await renderSuspended(TodoList, {
    global: {
      stubs: {
        TodoItem: {
          props: ['todo'],
          template: '<div data-testid="todo-item-stub" :todo-label="todo?.label" />',
        },
      },
    },
  })

  const stubs = screen.getAllByTestId('todo-item-stub')
  expect(stubs).toMatchSnapshot()
})

A good rule of thumb: use mockComponent when one file-level stub is enough, and use global stubs when each test needs more flexibility.

Mock auto-imports with mockNuxtImport

Nuxt auto-imports composables like useRuntimeConfig, useState, and useHead. When you need to replace one of those imports in a test, use mockNuxtImport.

For example, the default layout reads the app title from runtime config:

// layouts/default.vue
const { appTitle } = useRuntimeConfig().public

To test this layout, mock useRuntimeConfig and return a custom value:

// DefaultLayout.test.ts
import { mockNuxtImport, renderSuspended } from '@nuxt/test-utils/runtime'
import { screen } from '@testing-library/vue'
import DefaultLayout from '~/layouts/default.vue'

mockNuxtImport('useRuntimeConfig', () => {
  return () => ({
    app: { baseURL: '/' },
    public: {
      appTitle: 'My Custom Title',
    },
  })
})

describe('Default Layout', () => {
  test('renders the appTitle from useRuntimeConfig in the headline', async () => {
    await renderSuspended(DefaultLayout)

    expect(screen.getByText('My Custom Title')).toBeDefined()
  })
})

mockNuxtImport can only be used once per imported symbol per test file because it is transformed into a hoisted vi.mock. When you need to reuse the same mock with different values, pair it with vi.hoisted.

Consider this useDarkMode composable, which relies on Nuxt’s auto-imported useState:

// app/composables/useDarkMode.ts
import themeConfig from '@/utils/theme'

export const useDarkMode = () => {
  const isDark = useState('darkMode', () => true)
  const theme = computed(() =>
    isDark.value ? themeConfig.DARK : themeConfig.LIGHT,
  )

  function toggleDarkMode() {
    isDark.value = !isDark.value
  }

  return { isDark, theme, toggleDarkMode }
}

In the test, create one hoisted mock function and set its return value inside each test:

// useDarkMode.test.ts
import { mockNuxtImport } from '@nuxt/test-utils/runtime'
import { ref } from 'vue'
import themeConfig from '~/utils/theme'
import { useDarkMode } from '~/composables/useDarkMode'

const { useStateMock } = vi.hoisted(() => ({ useStateMock: vi.fn() }))

mockNuxtImport('useState', () => useStateMock)

describe('useDarkMode', () => {
  test('starts in dark mode and toggles to light', () => {
    useStateMock.mockReturnValue(ref(true))

    const { isDark, theme, toggleDarkMode } = useDarkMode()

    expect(isDark.value).toBe(true)
    expect(theme.value).toEqual(themeConfig.DARK)

    toggleDarkMode()

    expect(isDark.value).toBe(false)
    expect(theme.value).toEqual(themeConfig.LIGHT)
  })

  test('starts in light mode and toggles to dark', () => {
    useStateMock.mockReturnValue(ref(false))

    const { isDark, theme, toggleDarkMode } = useDarkMode()

    expect(isDark.value).toBe(false)
    expect(theme.value).toEqual(themeConfig.LIGHT)

    toggleDarkMode()

    expect(isDark.value).toBe(true)
    expect(theme.value).toEqual(themeConfig.DARK)
  })
})

The important pattern is this pair:

const { useStateMock } = vi.hoisted(() => ({ useStateMock: vi.fn() }))

mockNuxtImport('useState', () => useStateMock)

That gives you one hoisted mock that each test can configure independently.

Test dynamic routes and Nuxt middleware

Dynamic routes are a common source of integration bugs in Nuxt because they combine several framework features: route params, middleware, server fetching, error handling, and head management.

The demo project has a todo detail page at pages/todos/[id].vue:

// pages/todos/[id].vue
import type { Todo } from '@/stores/todos'

definePageMeta({
  middleware: ['validate-todo-id'] as const,
})

const route = useRoute()
const todoId = Number(route.params.id)

const { data: todo, error: fetchError } = await useFetch<Todo>(`/api/todos/${todoId}`)

if (fetchError.value) {
  throw fetchError.value
}

useHead({
  title: `Todo: ${todo.value?.label}`,
})

This page uses multiple Nuxt features:

  • definePageMeta to attach route middleware
  • useRoute to read the dynamic id parameter
  • useFetch to load a todo from a Nitro server route
  • useHead to set the page title
  • Nuxt error handling for invalid or missing todos

Start with the happy path. The test registers a mock server endpoint, renders the page at /todos/42, and verifies both the visible content and useHead call:

// DetailPageHappyPath.test.ts
import { mockNuxtImport, registerEndpoint, renderSuspended } from '@nuxt/test-utils/runtime'
import { screen } from '@testing-library/vue'
import { describe, expect, test, vi } from 'vitest'
import type { Todo } from '~/stores/todos'
import DetailPage from '~/pages/todos/[id].vue'

const mockTodo: Todo = {
  id: 42,
  label: 'Buy groceries',
  date: '2026-03-26',
  checked: false,
}

registerEndpoint('/api/todos/42', () => mockTodo)

const { useHeadMock } = vi.hoisted(() => ({ useHeadMock: vi.fn() }))

mockNuxtImport('useHead', () => useHeadMock)

describe('Detail Page - happy path', () => {
  test('renders the todo title and date and sets the title correctly', async () => {
    await renderSuspended(DetailPage, { route: '/todos/42' })

    expect(screen.getByText('Buy groceries')).toBeDefined()
    expect(screen.getByText(/2026-03-26/)).toBeDefined()
    expect(useHeadMock).toHaveBeenCalledWith({ title: 'Todo: Buy groceries' })
  })
})

For good coverage, also test the error paths. If the route contains a valid integer but the server route has no matching todo, the page should throw a 404:

// DetailPageErrorCase.test.ts
import { registerEndpoint, renderSuspended } from '@nuxt/test-utils/runtime'
import { screen } from '@testing-library/vue'
import type { NuxtError } from '#app'
import DetailPage from '~/pages/todos/[id].vue'
import ErrorPage from '~/error.vue'

registerEndpoint('/api/todos/999', () => {
  throw createError({
    statusCode: 404,
    statusMessage: 'Todo with id 999 not found',
  })
})

test('throws a 404 when the todo does not exist', async () => {
  await expect(
    renderSuspended(DetailPage, {
      route: '/todos/999',
    }),
  ).rejects.toMatchObject({
    statusCode: 404,
    statusMessage: 'Todo with id 999 not found',
  })
})

If the route parameter is not a valid integer, the middleware should throw a 400:

test('throws a 400 when the todo id is not a valid integer', async () => {
  await expect(
    renderSuspended(DetailPage, { route: '/todos/abc' }),
  ).rejects.toMatchObject({
    statusCode: 400,
    statusMessage: 'Invalid todo id: "abc"',
  })
})

You can also test the error page itself:

test('renders status code, message, and back to home button', async () => {
  await renderSuspended(ErrorPage, {
    props: {
      error: { status: 500, message: 'Something went wrong' } as NuxtError,
    },
  })

  expect(screen.getByText('500')).toBeDefined()
  expect(screen.getByText('Something went wrong')).toBeDefined()
  expect(screen.getByText('← Back to home')).toBeDefined()
})

Test Nuxt middleware in isolation

The previous examples test middleware through a real page render. That gives you confidence that the middleware is wired into the route correctly. Sometimes, though, you only want to test the middleware logic quickly.

For that, import the middleware directly and call it with minimal fake route objects.

Here is the middleware implementation:

// app/middleware/validate-todo-id.ts
export default defineNuxtRouteMiddleware((to) => {
  const id = to.params.id as string

  if (!/^\d+$/.test(id)) {
    abortNavigation(
      createError({
        statusCode: 400,
        statusMessage: `Invalid todo id: "${id}"`,
      }),
    )
  }
})

The test mocks abortNavigation and createError, creates fake route objects, and verifies both the allowed and rejected cases:

// ValidateTodoIdMiddleware.test.ts
import { mockNuxtImport } from '@nuxt/test-utils/runtime'
import type { RouteLocationNormalized } from 'vue-router'
import validateTodoId from '~/middleware/validate-todo-id'

const { abortNavigationMock, createErrorMock } = vi.hoisted(() => {
  return {
    abortNavigationMock: vi.fn(),
    createErrorMock: vi.fn((err) => err),
  }
})

mockNuxtImport('abortNavigation', () => abortNavigationMock)
mockNuxtImport('createError', () => createErrorMock)

function fakeRoute(id: string): RouteLocationNormalized {
  return { params: { id } } as unknown as RouteLocationNormalized
}

const homeRoute = {
  name: 'index',
  path: '/',
  fullPath: '/',
} as RouteLocationNormalized

describe('validate-todo-id middleware', () => {
  beforeEach(() => {
    vi.clearAllMocks()
  })

  test('allows navigation for a valid numeric id', () => {
    validateTodoId(fakeRoute('42'), homeRoute)

    expect(abortNavigationMock).not.toHaveBeenCalled()
  })

  test('aborts navigation for a non-numeric id', () => {
    validateTodoId(fakeRoute('abc'), homeRoute)

    expect(createErrorMock).toHaveBeenCalledWith(
      expect.objectContaining({
        statusCode: 400,
        statusMessage: 'Invalid todo id: "abc"',
      }),
    )
    expect(abortNavigationMock).toHaveBeenCalled()
  })

  test('aborts navigation for an empty id', () => {
    validateTodoId(fakeRoute(''), homeRoute)

    expect(createErrorMock).toHaveBeenCalledWith(
      expect.objectContaining({
        statusCode: 400,
        statusMessage: 'Invalid todo id: ""',
      }),
    )
    expect(abortNavigationMock).toHaveBeenCalled()
  })
})

Use isolated middleware tests for fast validation of route rules. Keep at least one page-level runtime test to confirm the middleware is actually connected to the route.

Tier 3: End-to-end tests in the node environment

E2E tests exercise the full Nuxt stack. Unlike happy-dom tests, they do not assert against a fake DOM. Unlike nuxt environment tests, they can run against a real Nuxt server and, if needed, a real browser.

Use e2e tests for critical flows where SSR, routing, middleware, API handlers, hydration, and browser interaction all need to work together.

Smoke test SSR output with setup and $fetch

By the time you reach this tier, you usually leave most mocking behind. You do not use registerEndpoint or mockNuxtImport because a real Nuxt server starts before the suite runs and tears down afterward.

The simplest e2e smoke test starts the Nuxt server and fetches the SSR-rendered HTML:

// e2e/app.test.ts
import { $fetch, setup } from '@nuxt/test-utils/e2e'

describe('app', async () => {
  await setup()

  test('checks availability of input', async () => {
    const html = await $fetch('/')
    expect(html).toContain('What needs to be done?')
  })
})

When using setup, await it at the top of the describe block before any tests run. The server stays up for the duration of the suite and is torn down automatically.

Test server API routes with $fetch and fetch

@nuxt/test-utils/e2e provides two similar APIs for server requests:

API Use it when Return behavior
$fetch You care about parsed HTML or JSON payloads Uses ofetch, parses responses, and throws on non-2xx status codes
fetch You need the raw response object or status code Returns a response so you can assert status, headers, and body
createPage You need real browser interaction Creates a Playwright page connected to the running Nuxt server

For example, use $fetch when you only need the payload:

test('fetches the homepage', async () => {
  const html = await $fetch<string>('/')

  expect(html).toContain('<!DOCTYPE html>')
})

test('fetches JSON API endpoint', async () => {
  const data = await $fetch('/api/health')

  expect(data).toEqual({ status: 'ok' })
})

Use fetch when you need to assert on response status codes:

// e2e/api.test.ts
import { $fetch, fetch, setup } from '@nuxt/test-utils/e2e'
import type { FetchError } from 'ofetch'

interface Todo {
  id: number
  label: string
  date: string
  checked: boolean
}

describe('server API routes', async () => {
  await setup()

  test('POST /api/todos creates a todo and returns status 201', async () => {
    const response = await fetch('/api/todos', {
      method: 'POST',
      headers: { 'Content-Type': 'application/json' },
      body: JSON.stringify({ label: 'test todo' }),
    })

    const todo: Todo = await response.json()

    expect(response.status).toBe(201)
    expect(todo.label).toBe('test todo')
    expect(todo.checked).toBe(false)

    const todos = await $fetch<Todo[]>('/api/todos')
    expect(todos.length).toBe(1)
  })

  test('GET /api/todos/:id returns the todo by id', async () => {
    const created = await $fetch<Todo>('/api/todos', {
      method: 'POST',
      body: { label: 'Fetch by id' },
    })

    const todo = await $fetch<Todo>(`/api/todos/${created.id}`)

    expect(todo.id).toBe(created.id)
    expect(todo.label).toBe('Fetch by id')
  })

  test('GET /api/todos/:id returns 404 for an unknown id', async () => {
    const error = await $fetch<never>('/api/todos/0').catch((e: FetchError) => e)

    expect(error.status).toBe(404)
  })
})

Test browser flows with Playwright and createPage

For real browser interaction, use createPage from @nuxt/test-utils/e2e. This gives you a configured Playwright page connected to the Nuxt test server.

The following test creates a todo item, navigates to its detail page, and returns home:

import { createPage, fetch, setup, url } from '@nuxt/test-utils/e2e'
import { beforeEach, describe, expect, test } from 'vitest'

describe('navigation flow', async () => {
  await setup({ browser: true })

  beforeEach(async () => {
    await fetch('/api/todos', {
      method: 'PATCH',
      body: JSON.stringify({ checked: true }),
      headers: { 'Content-Type': 'application/json' },
    })

    await fetch('/api/todos', { method: 'DELETE' })
  })

  test('adds a todo, navigates to detail page, then back home via headline', async () => {
    const page = await createPage()
    await page.goto(url('/'), { waitUntil: 'domcontentloaded' })

    const todoLabel="nav test"
    await page.fill('.todo-input input', todoLabel)
    await page.keyboard.press('Enter')

    const itemLink = page.locator('.item-label', { hasText: todoLabel })
    await itemLink.click()

    await page.waitForSelector('.todo-detail__title')
    const titleText = await page.locator('.todo-detail__title').textContent()
    expect(titleText?.trim()).toBe(todoLabel)

    await page.locator('.layout-headline-link').click()
    await page.waitForSelector('.todo-input input', { state: 'visible' })
  })
})

This test writes data, so it must clean up between runs. The example checks existing todos and deletes them before each test to keep the test isolated.

If you want to debug in a visible browser, set headless to false:

await setup({
  browser: true,
  browserOptions: {
    type: 'chromium',
    launch: { headless: false, slowMo: 600 },
  },
})

Nuxt’s Playwright integration also supports hydration-aware navigation. For example:

await page.goto(url('/'), { waitUntil: 'commit' })
await page.goto(url('/'), { waitUntil: 'hydration' })

This is useful when debugging hydration mismatches. A common example is locale-sensitive formatting: the server renders a date or currency value using the Node.js locale, while the browser formats it using the user’s system locale. The SSR HTML and client output differ, causing Vue to patch the DOM and report a hydration mismatch.

Common Nuxt testing mistakes

Here are the most common mistakes to watch for when building a Nuxt test suite:

Mistake Why it causes problems Better approach
Mocking global fetch for a useFetch page Nuxt may resolve server routes through Nitro rather than browser fetch Use registerEndpoint in the nuxt environment
Using mount for Nuxt-dependent components Routing, plugins, and async setup may not be initialized Use mountSuspended or renderSuspended
Treating mockNuxtImport like a normal per-test mock It is hoisted, so multiple implementations in one file can be tricky Use vi.hoisted or split tests into separate files
Forgetting to clear mocks Call history leaks between tests Run vi.clearAllMocks() in beforeEach
Overusing e2e tests They are slower and harder to maintain Use unit or Nuxt runtime tests when they provide enough confidence
Mixing runtime and e2e utilities in one file They require different Vitest environments Keep runtime and e2e tests in separate files

Conclusion

Nuxt ships with @nuxt/test-utils, which builds on Vue Test Utils and provides APIs for testing Nuxt-specific behavior like auto-imports, routing, SSR, and server routes.

This guide covered three testing tiers:

  • Unit tests verify components, composables, and pure logic in isolation
  • Nuxt runtime tests verify Nuxt-specific wiring, including routing, middleware, modules, and data fetching
  • E2E tests verify the full app flow from the user’s perspective, including SSR, hydration, navigation, and server APIs

As a rule of thumb, start with the lowest tier that gives you sufficient confidence. Use unit tests for pure logic, Nuxt runtime tests when framework behavior matters, and e2e tests for critical flows where the whole stack needs to work together.

That balance gives you a Nuxt test suite that is fast enough to run often, realistic enough to catch integration bugs, and focused enough to maintain as your application grows.

PakarPBN

A Private Blog Network (PBN) is a collection of websites that are controlled by a single individual or organization and used primarily to build backlinks to a “money site” in order to influence its ranking in search engines such as Google. The core idea behind a PBN is based on the importance of backlinks in Google’s ranking algorithm. Since Google views backlinks as signals of authority and trust, some website owners attempt to artificially create these signals through a controlled network of sites.

In a typical PBN setup, the owner acquires expired or aged domains that already have existing authority, backlinks, and history. These domains are rebuilt with new content and hosted separately, often using different IP addresses, hosting providers, themes, and ownership details to make them appear unrelated. Within the content published on these sites, links are strategically placed that point to the main website the owner wants to rank higher. By doing this, the owner attempts to pass link equity (also known as “link juice”) from the PBN sites to the target website.

The purpose of a PBN is to give the impression that the target website is naturally earning links from multiple independent sources. If done effectively, this can temporarily improve keyword rankings, increase organic visibility, and drive more traffic from search results.
Jasa Backlink

Download Anime Batch

Testing a Nuxt application is not the same as testing plain Vue components. Vue is a frontend framework for building reactive UI components; Nuxt is a full-stack framework built on top of Vue that adds server-side rendering, file-based routing, auto-imports, layouts, middleware, Nitro server routes, and deployment conventions. That extra framework layer is exactly why Nuxt testing needs its own

When a user signs up for a large platform, one of the first operations is checking whether their desired username is already taken. At a small scale, this is simple: query the database and return a yes or no answer. At scale, that same check can become expensive, especially if your signup form validates availability as users type.

A Bloom filter can reduce that pressure by acting as a fast, in-memory pre-check before the database. It does not replace the database or your unique constraint. Instead, it answers one useful question very quickly: “Is this username definitely not in the existing set?” If the Bloom filter says no, you can skip the database lookup for the availability check. If it says the username might exist, you fall back to the database for confirmation.

This approach works well for username availability because Bloom filters can produce false positives, but not false negatives for items that have actually been inserted into the filter. In practice, that means a new username may occasionally trigger an unnecessary database lookup, but the system will not incorrectly accept a duplicate username as long as the final write still goes through the database.

The repository associated with this article contains the code for the examples below.

Why direct username checks become expensive

The simplest way to check username availability is to query the users table:

SELECT 1 FROM users WHERE username="alice" LIMIT 1;

For a small app, this is perfectly reasonable. But for a large platform, username checks can generate a surprising amount of read traffic. A signup form may validate availability repeatedly as users type, and most of those checks will be for usernames that do not exist.

Even with proper indexing, every lookup still needs to travel through the database path. Caching helps when the same usernames are checked repeatedly, but it is less useful for random or newly typed usernames that have never been requested before.

The question is not whether the database can answer this query. It can. The question is whether the database should be the first system asked every time.

What is a Bloom filter?

A Bloom filter is a probabilistic data structure used to test whether an item may belong to a set. It stores membership information in a compact bit array instead of storing the full values themselves.

When you add a value, such as a username, the Bloom filter runs that value through multiple hash functions. Each hash function maps the username to a position in the bit array, and the filter sets those positions to 1.

When you check a username later, the filter runs the same hash functions again:

Bloom filter result Meaning What to do next
One or more bits are 0 The username is definitely not in the filter Treat it as available for the read-time availability check
All required bits are 1 The username is probably in the filter Confirm with the database
False positive The filter says “probably present,” but the username is not in the database Perform one unnecessary database lookup
False negative Standard Bloom filters do not produce this for values that were inserted If this happens in production, the filter is stale or incorrectly maintained

This tradeoff is the main reason Bloom filters are useful: they can rule out non-membership with certainty, while membership is only approximate.

How Bloom filters work

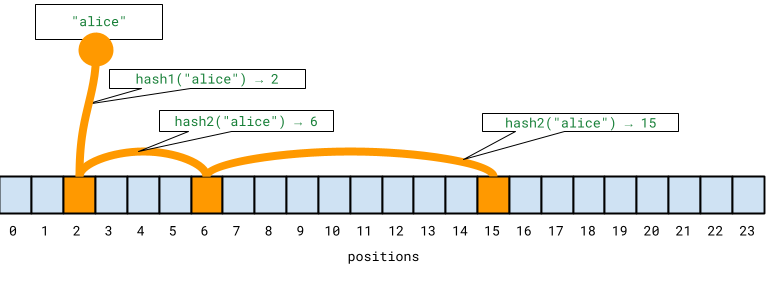
You can think of each inserted username as leaving a small trail of footprints across a bit array. Each hash function marks one position, so inserting a username like "alice" stamps a specific pattern of bits.

When you check "alice" later, the filter follows the same trail. If any footprint is missing, the username was never inserted into the filter.

Adding "alice" to a Bloom filter sets several positions in the bit array based on its hash outputs.
Adding “alice” to a Bloom filter sets several positions in the bit array based on its hash outputs.

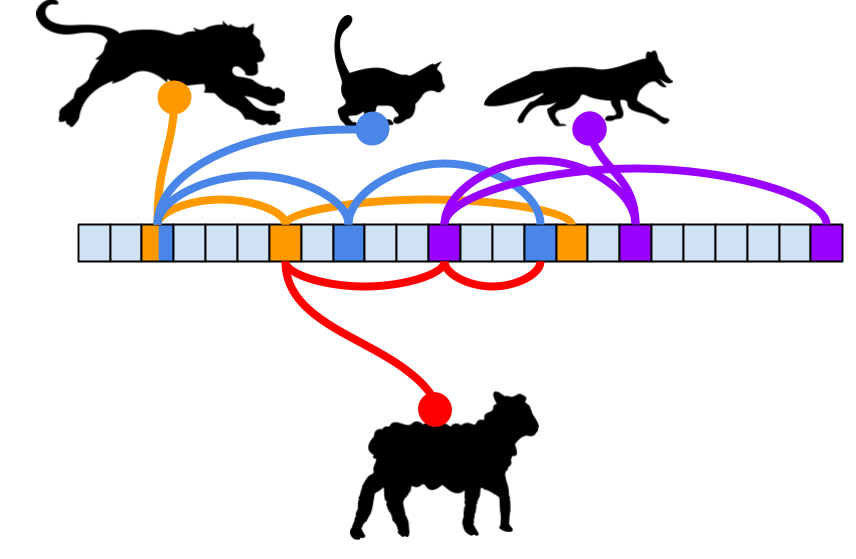
As more usernames are added, these trails start to overlap. Different usernames may set some of the same bits. Eventually, the filter may find that all required bits are already set for a username that was never inserted. That is a false positive.

In a username availability system, this is acceptable. A false positive only means the application performs a database lookup to confirm whether the username is actually taken. It does not mean the system accepts duplicate usernames.


As more usernames are added, their hashed positions can overlap, which is what makes false positives possible in a Bloom filter.

Building a Bloom filter in Python

To make the idea concrete, we can build a small prototype using the rbloom library. rbloom is a Python Bloom filter library implemented in Rust, and it exposes an API that feels similar to Python’s built-in set.

Install it first:

pip install rbloom

Then create a Bloom filter configured for 1 million expected usernames with a 1 percent false-positive rate:

from rbloom import Bloom

EXPECTED_USERS = 1_000_000
FALSE_POSITIVE_RATE = 0.01

bf = Bloom(EXPECTED_USERS, FALSE_POSITIVE_RATE)

The first argument is the expected number of items. The second controls the target false-positive rate. Lowering the false-positive rate requires more memory, but it reduces the number of unnecessary database lookups.

Next, generate a mock user base and insert each username into the filter:

existing_users = [f"user_{i}" for i in range(EXPECTED_USERS)]

for username in existing_users:
    bf.add(username)

For this prototype, we can represent the database with a Python set. In a real application, this would be your users table, identity service, or another persistent data store:

user_db = set(existing_users)

def check_database(username: str) -> bool:
    return username in user_db

Now we can define the availability check:

def is_username_available(username: str) -> bool:
    if username not in bf:
        return True

    return not check_database(username)

This function uses the Bloom filter as the first gate:

  1. If the username is definitely not in the filter, the function returns True without querying the database.
  2. If the username might be in the filter, the function checks the database to confirm.

Try it with a new username and an existing username:

print(is_username_available("new_user"))  # True
print(is_username_available("user_42"))   # False

For most new usernames, the Bloom filter can answer the availability check without touching the database.

Measuring false positives

Bloom filters are probabilistic, so it is worth observing false positives directly. We can generate random usernames that are not part of the original dataset and count how often the Bloom filter reports that they may already exist:

import random
import string

def random_username(length: int = 10) -> str:
    return "".join(random.choices(string.ascii_lowercase, k=length))

false_positives = 0
tests = 10_000

for _ in range(tests):
    username = random_username()

    if username in bf and username not in user_db:
        false_positives += 1

print(f"False positives: {false_positives}/{tests}")

With a configured false-positive rate of 1 percent, the number of false positives should stay relatively small and predictable across a large enough sample.

The important point is that false positives do not compromise correctness in this design. They only send the request to the database, which is the same path the system would have used without the Bloom filter.

Why this reduces database load

The performance benefit comes from moving most negative checks out of the database path. In a username availability flow, most requested usernames are not already taken. A Bloom filter can reject those non-members quickly and in memory.

That gives you two advantages:

Benefit Why it matters
Fewer database reads Most unavailable-check requests for new usernames never hit the database
Lower latency In-memory checks are faster than round trips to a persistent data store
Predictable memory usage Bloom filters store bit patterns, not full usernames
Safe fallback path Ambiguous cases still go to the database

This pattern is especially useful when the cost of a false positive is low. In this case, the cost is only an extra database lookup. The cost of accepting a duplicate username, however, would be much higher, so the database must remain the final source of truth.

Production considerations

The Python example shows the core idea, but a production username availability system needs additional safeguards.

Keep the database as the source of truth

A Bloom filter should not be the final authority for creating usernames. It should speed up availability checks, but the database should still enforce a unique constraint on the username column.


More great articles from LogRocket:


That final constraint protects you from race conditions. For example, two users could check the same available username at nearly the same time. Even if both read-time checks return “available,” only one final insert should succeed.

Keep the filter up to date

A standard Bloom filter does not produce false negatives for items that were inserted into it. However, a production system can still return incorrect results if the filter is stale.

For example, if a username is written to the database but not added to the Bloom filter, a later availability check may incorrectly skip the database. To avoid this, update the filter when usernames are created, and consider rebuilding it periodically from the source of truth.

Plan for deletions and username changes

Standard Bloom filters do not support deleting individual items. If your product lets users delete accounts or change usernames, the filter may continue to report old usernames as “probably present.”

That does not create a correctness problem, because the database fallback will confirm availability. But it can reduce the filter’s usefulness over time by increasing unnecessary database checks. If deletions matter for your use case, consider a counting Bloom filter, a Cuckoo filter, or a scheduled rebuild.

Use a distributed implementation

A local in-memory Bloom filter may work for a single service instance, but many production systems run across multiple instances or regions. In that case, each instance needs a consistent view of the filter.

Tools such as Redis probabilistic data structures can help here. Redis supports scalable Bloom and Cuckoo filters for membership checks, which makes it a practical option when you need a shared filter layer across services.

When should you use a Bloom filter?

Bloom filters are a good fit when:

  • You need fast membership checks against a large set
  • Most queries are expected to be negative
  • False positives are acceptable
  • False negatives are not acceptable for inserted values
  • There is a reliable source of truth behind the filter

They are not a good fit when:

  • You need exact answers every time
  • You need frequent deletions without rebuilding or using a different filter type
  • A false positive is expensive or user-visible
  • You cannot keep the filter synchronized with the source of truth

For username availability, the fit is strong because a false positive only causes an extra database check, while a negative result can safely avoid one.

Conclusion

Bloom filters are a practical way to reduce database load when checking username availability at scale. By accepting a controlled probability of false positives, you can bypass many unnecessary lookups while preserving correctness through a database fallback.

The key is to use the Bloom filter for what it does best: ruling out usernames that definitely do not exist in the filter. It should not replace the database, the unique index, or the final insert-time check. Instead, it acts as a fast pre-check that keeps the common path lightweight and leaves the database for the cases that actually need confirmation.

That tradeoff appears across many large-scale systems. Bloom filters are useful whenever a compact, approximate membership test can prevent more expensive work downstream, from database lookups to duplicate event filtering to blockchain log searches.

PakarPBN

A Private Blog Network (PBN) is a collection of websites that are controlled by a single individual or organization and used primarily to build backlinks to a “money site” in order to influence its ranking in search engines such as Google. The core idea behind a PBN is based on the importance of backlinks in Google’s ranking algorithm. Since Google views backlinks as signals of authority and trust, some website owners attempt to artificially create these signals through a controlled network of sites.

In a typical PBN setup, the owner acquires expired or aged domains that already have existing authority, backlinks, and history. These domains are rebuilt with new content and hosted separately, often using different IP addresses, hosting providers, themes, and ownership details to make them appear unrelated. Within the content published on these sites, links are strategically placed that point to the main website the owner wants to rank higher. By doing this, the owner attempts to pass link equity (also known as “link juice”) from the PBN sites to the target website.

The purpose of a PBN is to give the impression that the target website is naturally earning links from multiple independent sources. If done effectively, this can temporarily improve keyword rankings, increase organic visibility, and drive more traffic from search results.
Jasa Backlink

Download Anime Batch

When a user signs up for a large platform, one of the first operations is checking whether their desired username is already taken. At a small scale, this is simple: query the database and return a yes or no answer. At scale, that same check can become expensive, especially if your signup form validates availability as users type. A Bloom

Which AI frontend dev tech reigns supreme? This post is here to answer that question. We’ve put together a comparison engine to help you evaluate AI models and tools side-by-side, produced an updated power rankings to show off the highest performing tech of June 2026, and conducted a thorough analysis across 50+ features to help spotlight the best models/tools for every purpose.

We’ve separately ranked AI models and AI-powered development tools. A quick refresher on how to distinguish these:

  • AI models are the underlying language models that provide the intelligence behind coding assistance (accessed through APIs or web interfaces), while
  • AI tools are comprehensive development environments that integrate AI capabilities into your workflow, featuring specialized features and user interfaces.

In this edition, we’re comparing 17 AI models and 12 development tools. It’s our most comprehensive analysis yet, and we no longer use SWE-bench; we now use WebDev AI.

Click the links below for LogRocket deep dives on select tools and models:

AI models:

AI development tools:

Let’s dive in!

🚀 Sign up for The Replay newsletter

The Replay is a weekly newsletter for dev and engineering leaders.

Delivered once a week, it’s your curated guide to the most important conversations around frontend dev, emerging AI tools, and the state of modern software.

How we ranked these AI technologies

We ranked these tools using a holistic scoring approach. This was our rating system:

  1. Technical performance (30%)
    • WebDev AI Leaderboard (Arena.ai) scores as the primary benchmark
    • Total context window sizes
    • Context window output
    • Feature completeness across development capabilities
    • Memory
  2. Practical usability (25%)
    • Modern web development features (voice input, multimodal capabilities)
    • Quality and optimization tools
    • Workflow integration capabilities
  3. Value proposition (25%)
    • Price-to-performance ratios
    • Free tier availability
    • Open source licensing and self-hosting options
  4. Accessibility and deployment (20%)
    • Enterprise features and privacy options
    • Availability and access restrictions
    • IDE integration quality

Key June Rankings Updates

Here are the biggest changes in the rankings this month, and the factors that contributed to the shake-up:

AI model rankings

June 2026 saw five new models enter the field, the largest single-month intake this year:

  • Claude Opus 4.7 (#1) ↔️ holds the top spot. No new entrant displaced it on WebDev Arena (1567 Elo), MCP-Atlas tool use (77.3%), or blind code quality reviews. It remains the model to beat at unchanged $5/$25 pricing.
  • GPT-5.5 (#2) 🆕 enters as OpenAI’s first fully retrained base model since GPT-4.5. Terminal-Bench 2.0 leader at 82.7% and 52.5% fewer hallucinations than its predecessor. No public API pricing yet — available only through ChatGPT subscription tiers and Codex. Displaces GPT-5.4.
  • Qwen 3.7 Max (#3) 🆕 is the month’s biggest surprise, debuting at #4 on WebDev Arena (1541 Elo), ahead of Claude Opus 4.6, at half the price ($2.50/$7.50). Agent-first architecture with 35-hour autonomous runs. Text-only with no vision input is its one hard limitation.

AI tool rankings

For the tools ranking, we have prioritized comprehensive workflow integration and value proposition, with free offerings and unique capabilities taking precedence.

June 2026 brought the first major disruption to the tools category since Cursor 3’s rebuild:

  • OpenCode (#1) 🆕 takes the top spot as the most-adopted open-source coding agent (160K+ GitHub stars, 7.5M MAU). Model-agnostic access to 75+ providers, unique LSP integration, air-gapped deployment, and MIT licensing make it the most flexible option available.
  • Cursor (#2) ⬇️ drops from #1 but remains the best full-IDE experience with Cursor 3’s agent-first rebuild, Composer 2, and plugin marketplace at Free–$200.
  • Claude Code (#3) ↔️ holds position as the quality leader. Blind code reviews prefer its output 67% of the time. Opus 4.7 and /ultrareview keep it the strongest CLI for teams that prioritize code quality over speed.

Power rankings: AI models – June 2026

Our June 2026 power rankings highlight AI models that either recently hit the scene or released a major update in the past two months.

1. Claude Opus 4.7 – The agentic coding leader ↔️

Previous ranking: 1

Performance summary: Claude Opus 4.7 still holds #1 with the top WebDev Arena score (1567 Elo with thinking, 1562 without). Five new frontier models entered this month, and none displaced Opus. 3.75MP vision, best-in-class MCP-Atlas (77.3%), xhigh effort, and /ultrareview remain unmatched in combination. At $5/$25 pricing, it’s no longer the cheapest frontier option, but it’s still the one that ships the cleanest code. If you’re looking to get more from this model, our guide on the top Claude skills for React is worth a read.

2. GPT-5.5 – The autonomous workhorse 🆕

Previous ranking: New entry

Performance summary: GPT-5.5 enters at #2 as OpenAI’s first fully retrained base model since GPT-4.5. Terminal-Bench 2.0 leader at 82.7%, 52.5% fewer hallucinations than GPT-5.4, and improved signal-to-noise on code reviews per CodeRabbit benchmarks. WebDev Arena ranks it #11 (1505 Elo) — strong but not dominant on frontend specifically. The biggest catch: no public API pricing yet, limited to ChatGPT Plus/Pro/Business/Enterprise and Codex. Displaces GPT-5.4, which drops out of the top 5.

3. Qwen 3.7 Max — The agent-first dark horse 🆕

Previous ranking: New entry

Performance summary: Qwen 3.7 Max debuts at #3 with the fourth-highest WebDev Arena Elo (1541, preliminary) — ahead of Claude Opus 4.6 and every GPT variant. Alibaba’s internal demo ran it autonomously for 35 hours with 1,158 tool calls. MCP-Atlas 76.4% is second only to Opus 4.7. At $2.50/$7.50 it undercuts Claude and GPT significantly. The hard limitation: text-only with zero vision, audio, or video input — the only top-5 model that can’t do design-to-code.

4. Claude Opus 4.6 – The proven performer ⬇️

Previous ranking: 3

Performance summary: Opus 4.6 drops one spot as Qwen 3.7 Max edges it on WebDev Arena (1541 vs 1538). It remains the safe choice: 1M context, 128K output, Agent Teams, adaptive thinking, and the deepest MCP ecosystem. At $5/$25 it’s now harder to justify over Opus 4.7 (same price) or Qwen 3.7 Max (half the price, higher Arena rank). Stable workflows have no urgency to migrate.

5. Claude Sonnet 4.6 – The accessible powerhouse ↔️

Previous ranking: 5

Performance summary: Claude Sonnet 4.6 holds at #5. It remains the default free model on claude.ai with a 1M context window in beta, adaptive thinking, and near-Opus performance at $3/$15 Sonnet pricing. For teams that don’t need Opus-tier power, it’s still the best value in the Claude lineup.

June 2026 brought the first major disruption to the tools category since Cursor 3’s rebuild, with OpenCode entering at #1:

1. OpenCode — The open infrastructure leader 🆕

Previous ranking: New entry

Performance summary: OpenCode takes #1 as the most significant shift in how developers work with AI coding agents. At 160K+ GitHub stars and 7.5M monthly active developers, it’s the most-adopted open-source coding agent ever built. The case is simple: model-agnostic access to 75+ providers (Claude, GPT, Gemini, DeepSeek, local via Ollama), LSP integration that feeds compiler diagnostics back to the model (unique — no other tool does this), background subagents, Scout agent for external research, and true air-gapped deployment for regulated industries. It’s 78% slower than Claude Code on the same model (Builder.io test), but generates more thorough output (21 extra tests in head-to-head). The BYOK pricing model means your cost is your provider’s cost, not OpenCode’s. MIT-licensed, fully forkable, and the agent harness the community is building around. For a deeper look at how these AI agents are shaping the future of developer workflows, see our dedicated analysis.

2. Cursor – The agent-first powerhouse ⬇️

Previous ranking: 1

Performance summary: Cursor drops to #2 — not because it regressed, but because OpenCode’s open infrastructure approach represents a different paradigm. Cursor 3 remains the best full-IDE experience: agent-first rebuild, Composer 2, multi-repo workspaces, parallel local and cloud agents, plugin marketplace, and commit-to-merged-PR workflows. At Free–$200, it’s the premium choice for developers who want everything in one polished interface

3. Claude Code — The quality-first professional tool ↔️

Previous ranking: 3

Performance summary: Claude Code holds #3 as the tool that ships the cleanest code. Blind reviews show its output preferred 67% of the time vs Codex’s 25%. Opus 4.7 with /ultrareview, auto mode for Max users, xhigh default effort, 1M context, Agent Teams, and automatic memory remain best-in-class for quality-over-speed workflows. At $20–$200 with no free tier, accessibility is still its main limitation. If you’re evaluating Claude Code against other AI dev tools in a broader comparison, our power rankings breakdown covers the full picture.

4. Windsurf – The agentic workflow champion ⬇️

Previous ranking: 2

Performance summary: Windsurf drops two spots as OpenCode and Cursor’s rebuild push past it. Arena Mode, Plan Mode, parallel multi-agent sessions with Git worktrees, and Cascade remain excellent. Claude Opus 4.7 support is live. At Free–$60, it’s still the best balance of features and price for developers who want a full IDE without Cursor’s premium tier.

5. Antigravity – The free disruptor ⬇️

Previous ranking: 4

Performance summary: Antigravity drops one spot but retains its core advantage: completely free during preview. Multi-agent orchestration, integrated Chrome browser automation, and the most diverse free model lineup keep it the best zero-cost option. Note: Gemini CLI is being sunset June 18, 2026 — Antigravity CLI is its replacement, now built in Go with async workflows and unified architecture.

Having a hard time picking one model or tool over another? Or maybe you have a few favorites, but your budget won’t allow you to pay for all of them.

We’ve built this comparison engine to help you make informed decisions.

How it works

Simply select between two and four AI technologies you’re considering, and the comparison engine instantly highlights their differences.

This targeted analysis helps you identify which tools best match your specific requirements and budget, ensuring you invest in the right combination for your workflow.

The comparison engine analyzes 29 leading AI models and tools across specific features, helping developers choose based on their exact requirements rather than subjective assessments. Most comparisons rate the AI capabilities in percentages and stars, but this one informs you of specific features each AI has over another.

Pro tip: No single tool dominates every category, so choosing based on feature fit is often the smartest approach for your workflow. For a broader look at how splitting work across AI agents affects productivity, our testing breakdown covers what actually saves time.

If you’re more of a visual learner, we’ve also put together tables that compare these tools across different criteria. Rather than overwhelming you with all 50+ features at once, we’ve grouped them into focused categories that matter most to frontend developers.

AI model comparison tables

This section evaluates the core AI models that power development workflows. These are the underlying language models that provide the intelligence behind coding assistance, whether accessed through APIs, web interfaces, or integrated into various development tools. We compare their fundamental capabilities, performance benchmarks, and business considerations across 50+ features.


Development capabilities and framework support

This table compares core coding features and framework compatibility across AI development tools amongst AI models.

Key takeaway – Five new models join the field. GPT-5.5 enters as the strongest dedicated coding model, ranking #11 on WebDev Arena. Qwen 3.7 Max debuts at #4 but ships text-only — the only frontier model here that can’t do design-to-code. Kimi K2.6 leaps to #8 with 300-agent swarms and 12-hour autonomous sessions. DeepSeek V4 Pro matches frontier performance at 34× cheaper pricing. Seven models now offer 1M context windows, up from five last month:

Feature Claude Opus 4.5 Claude Opus 4.6 Claude Opus 4.7 Claude Sonnet 4.6 DeepSeek V4 Pro 🆕 Gemini 3 Pro Gemini 3.1 Pro GLM-4.6 GLM-5 GPT-5.2 GPT-5.4 GPT-5.5 🆕 Grok 4.3🆕 Kimi K2.5 Kimi K2.6 🆕 Llama 4 Maverick Qwen 3.7 Max 🆕
Real-time code completion
Multi-file editing
Design-to-code conversion
React component generation
Vue.js support
Angular support
TypeScript support
Tailwind CSS integration
Total Context Window 200K 1M 1M 1M (beta) 1M 1M 1M 200K 200K 400K 1M 1M 1M 256K 262.1k 10M (Scout) / 256K (Maverick) 1M
WebDev AI Leader Board 1490 1538 1562 1523 1464 1438 1448 1355 1436 1404 1457 1505 1377 1431 1518 1541
Semantic/deep search Limited
Autonomous agent mode
Extended thinking/reasoning ✅ (Always-on)
Tool use capabilities ✅ (Native)

Quality and optimization features

This table compares code quality, accessibility, and performance optimization capabilities across tools amongst AI models.

Key takeaway – All five new models enter with full ✅ across nearly every quality row — the quality floor for frontier models has effectively reached parity. Grok 4.3 and Qwen 3.7 Max both ship with always-on reasoning that can’t be disabled, meaning every response runs through chain-of-thought — a different philosophy from Claude and GPT’s togglable thinking modes. DeepSeek V4 Pro matches the full-✅ profile of models costing 10–30× more. For teams focused on TypeScript utility types and code quality, these models all offer strong support:

Feature Claude Opus 4.5 Claude Opus 4.6 Claude Opus 4.7 Claude Sonnet 4.6 DeepSeek V4 Pro 🆕 Gemini 3 Pro Gemini 3.1Pro GLM-4.6 GLM-5 GPT-5.2 GPT-5.4 GPT-5.5 🆕 Grok 4.3🆕 Kimi K2.5 Kimi K2.6 🆕 Llama 4 Maverick Qwen 3.7 Max 🆕
Responsive design generation
Accessibility (WCAG) compliance
Performance optimization suggestions
Bundle size analysis Limited
SEO optimization
Error debugging assistance
Code refactoring
Browser compatibility checks
Advanced reasoning mode
Code review capabilities
Security/vulnerability detection
Code quality scoring
Architecture/design guidance
Test generation
Code style adherence

Modern web development features

This table compares support for contemporary web standards like PWAs, mobile-first design, and multimedia input amongst AI models.

Key takeaway – The multimodal gap is now the clearest differentiator between new models. Grok 4.3 is the biggest mover, it jumps from “Limited” video on Grok 4 to native video input (mp4/mov/webm, 5 min at 1080p), making it one of only six models in this table with full video processing. GPT-5.5 enters with full ✅ across every row. Qwen 3.7 Max is the outlier: despite ranking #4 on WebDev Arena, it ships text-only with zero vision, audio, or video input, the strongest “code-only” model in the field. For a deeper look at why multimodal UX is the more practical future, see our full analysis:

Feature Claude Opus 4.5 Claude Opus 4.6 Claude Opus 4.7 Claude Sonnet 4.6 DeepSeek V4 Pro 🆕 Gemini 3 Pro Gemini 3.1Pro GLM-4.6 GLM-5 GPT-5.2 GPT-5.4 GPT-5.5 🆕 Grok 4.3🆕 Kimi k2.5 Kimi K2.6 🆕 Llama 4 Maverick Qwen 3.7 Max 🆕
Mobile-first design
Dark mode support
Internationalization (i18n) ✅ (200 langs)
PWA features
Offline capabilities Limited Limited Limited
Voice/audio input Limited Limited Limited
Image/design upload Limited ✅ (up to 8-10)
Video processing Limited Limited Limited Limited Limited
Multimodal capabilities Limited ✅ (Native, Early Fusion)

Business and deployment considerations

This table compares pricing models, enterprise features, privacy options, and deployment flexibility amongst AI models.

Key takeaway – DeepSeek V4 Pro is the pricing earthquake of this update: at $0.435/$0.87 per 1M tokens. Kimi K2.6 is the other open-weight standout at $0.95/$4.00 with Modified MIT licensing, undercutting every closed frontier model. Qwen 3.7 Max enters at $2.50/$7.50 — cheaper than Opus but pricier than Gemini 3.1 Pro ($2/$12) for comparable WebDev Arena performance:

Feature Claude Opus 4.5 Claude Opus 4.6 Claude Opus 4.7 Claude Sonnet 4.6 DeepSeek V4 Pro 🆕 Gemini 3 Pro Gemini 3.1 Pro GLM-4.6 GLM-5 GPT-5.2 GPT-5.4 GPT-5.5 🆕 Grok 4.3 🆕 Kimi K2.5 Kimi K2.6 🆕 Llama 4 Maverick Qwen 3.7 Max 🆕
Free tier available
Open source ✅ (Apache 2.0)
Self-hosting option
Enterprise features
Privacy mode
Custom model training Limited Limited Limited
API Cost (per 1M tokens) $5/$25 $5/$25 (standard) / $10/$37.50 (>200K tokens) $5/$25 (unchanged from Opus 4.6) $3/$15 $0.435/$0.87 (permanent since May 22 — cache-hit input $0.003625) $2/$12 (<200k tokens) / $4/$18 (>200k tokens) $2/$12 (<200K) / $4/$18 (>200K) $0.35/$0.39 $1.00/$3.20 $1.75/$14 $2.50/$15 (Standard) / $30/$180 (Pro) $5/$10 (Standard) $1.25/$2.50 $0.60/$2.00 $0.95/$4.00 $0.19–$0.49 (estimated) $2.50/$7.50 (cached input $0.25 — 90% discount)
Max Context Output 64K 128K 128K 64K 16K 64K 64K 128K 131K 128K 128K 64K 30K 64K 65.5K 256K 65.5K
Batch processing discount
Prompt caching discount

AI tool comparison tables

This section focuses on complete development environments and platforms that integrate AI capabilities into your workflow. These tools combine AI models with user interfaces, IDE integrations, and specialized features designed for specific development tasks. We evaluate their practical implementation, workflow integration, and user experience features.

Development capabilities and framework support (tools)

This table compares core coding features and framework compatibility across development tools.

Key takeaway – OpenCode enters as the first model-agnostic agentic CLI in the table, supporting 75+ providers including Claude, GPT, Gemini, DeepSeek, and fully local models via Ollama. Its LSP integration is unique — no other tool in this table feeds compiler diagnostics back to the model automatically. At 160K+ GitHub stars and 7.5M monthly active developers, it’s the most-adopted open-source coding agent available:

Feature GitHub Copilot Cursor Windsurf Vercel v0 Bolt.new Lovable AI Claude Code Codex Kimi Code Kiru AntiGravity OpenCode 🆕
Real-time code completion
Multi-file editing
Design-to-code conversion
React component generation
Vue.js support
Angular support
TypeScript support
Tailwind CSS integration
Native IDE integration ✅ (Full IDE) ✅ (Full IDE) ✅ (CLI) ✅ (CLI) ✅ (Full IDE)

Quality and optimization features (tools)

This table compares code quality, accessibility, and performance optimization capabilities across tools.

Key takeaway – OpenCode enters with full autonomous agent capabilities including background subagents and a Scout agent for external doc research — features that match Claude Code and Codex. Bundle size analysis remains unavailable across all 13 tools. Quality output is model-dependent since OpenCode is infrastructure, not a model:

Feature GitHub Copilot Cursor IDE Windsurf Vercel v0 Bolt.new Lovable AI Claude Code Codex Kimi Code Kiru AntiGravity OpenCode 🆕
Responsive design generation
Accessibility (WCAG) compliance Limited Limited Limited
Performance optimization suggestions Limited
Bundle size analysis
SEO optimization Limited
Error debugging assistance
Code refactoring
Browser compatibility checks Limited Limited Limited
Autonomous agent mode Limited Limited

Modern web development features (tools)

This table compares support for contemporary web standards and multimedia input across development tools.

Key takeaway – OpenCode is the only tool besides Lovable AI with true offline capabilities, and it goes further: air-gapped mode with Ollama means zero data leaves your machine. This makes it the only option for defense, healthcare, and fintech teams with strict data residency requirements. Voice/audio input remains absent, matching most CLI-based tools:

Feature GitHub Copilot Cursor IDE Windsurf Vercel v0 Bolt.new Lovable AI Claude Code Codex Kimi Code Kiru AntiGravity OpenCode 🆕
Mobile-first design
Dark mode support
Internationalization (i18n) Limited Limited
PWA features Limited Limited Limited Limited
Offline capabilities
Voice/audio input
Image/design upload
Screenshot-to-code Limited Limited
3D graphics support Limited Limited Limited Limited Limited Limited Limited Limited Limited Limited Limited

Development workflow integration

This table compares version control, collaboration, and development environment integration features.

Key takeaway – Antigravity, Windsurf, Vercel v0, Bolt.new, and Lovable AI with live preview/hot reload capabilities. Collaborative editing remains limited to Cursor, GitHub Copilot, Windsurf, and Lovable AI. OpenCode enters with the strongest git safety model in the CLI category: automatic snapshots before every change with /undo and /redo commands:

Feature GitHub Copilot Cursor IDE Windsurf Vercel v0 Bolt.new Lovable AI Claude Code Codex Kimi Code Kiru AntiGravity OpenCode 🆕
Git integration
Live preview/hot reload
Collaborative editing
API integration assistance
Testing code generation
Documentation generation
Search
Terminal integration Limited
Custom component libraries Limited

Business and deployment considerations (tools)

This table compares pricing models, enterprise features, privacy options, and deployment flexibility.

Key takeaway – OpenCode is the only tool in this table that’s both fully open-source (MIT) and offers true air-gapped deployment. Its tiered pricing — Free with bring-your-own-key, $10/mo Go for open-weight models, pay-as-you-go Zen, and $200/mo Black — gives the widest range of entry points. The BYOK model means your actual cost is determined by whichever provider you plug in, not by OpenCode itself:

Feature GitHub Copilot Cursor IDE Windsurf Vercel v0 Bolt.new Lovable AI Claude Code Codex Kimi Code Kiru AntiGravity OpenCode 🆕
Free tier available
Open source Partial
Self-hosting option Privacy mode Limited
Enterprise features
Privacy mode
Custom model training
Monthly Pricing Free–$39 Free–$200 Free–$60 $5–$30 Beta Free–$30 $20–$200 $20–$200 Free–$0.15 Free–$200 Free / $19.99 (Google AI Pro) Free (BYOK) / $10 (Go) / Pay-as-you-go (Zen) / $200 (Black — sold out)
Enterprise Pricing $39/user $40/user $60/user Custom Custom Custom Custom Custom Custom Custom (GovCloud ~20% higher) Incoming Custom

Conclusion

With AI development evolving at lightning speed, there’s no one-size-fits-all winner, and that’s exactly why tools like our comparison engine matter. By breaking down strengths, limitations, and pricing across the leading AI models and development platforms, you can make decisions based on what actually fits your workflow, not just hype or headline scores.

Whether you value raw technical performance, open-source flexibility, workflow integration, or budget-conscious scalability, the right pick will depend on your priorities. And as this month’s rankings show, leadership can shift quickly when new features roll out or pricing models change.

Test your top contenders in the comparison engine, match them to your needs, and keep an eye on next month’s update. We’ll be tracking the big moves so you can stay ahead.

Until then, happy building.

PakarPBN

A Private Blog Network (PBN) is a collection of websites that are controlled by a single individual or organization and used primarily to build backlinks to a “money site” in order to influence its ranking in search engines such as Google. The core idea behind a PBN is based on the importance of backlinks in Google’s ranking algorithm. Since Google views backlinks as signals of authority and trust, some website owners attempt to artificially create these signals through a controlled network of sites.

In a typical PBN setup, the owner acquires expired or aged domains that already have existing authority, backlinks, and history. These domains are rebuilt with new content and hosted separately, often using different IP addresses, hosting providers, themes, and ownership details to make them appear unrelated. Within the content published on these sites, links are strategically placed that point to the main website the owner wants to rank higher. By doing this, the owner attempts to pass link equity (also known as “link juice”) from the PBN sites to the target website.

The purpose of a PBN is to give the impression that the target website is naturally earning links from multiple independent sources. If done effectively, this can temporarily improve keyword rankings, increase organic visibility, and drive more traffic from search results.

Jasa Backlink

Download Anime Batch

Which AI frontend dev tech reigns supreme? This post is here to answer that question. We’ve put together a comparison engine to help you evaluate AI models and tools side-by-side, produced an updated power rankings to show off the highest performing tech of June 2026, and conducted a thorough analysis across 50+ features to help spotlight the best models/tools for


July 1, 2026 at 11:37 am,

No comments

In the rapidly evolving audiovisual integration landscape of 2026, schematic CAD software has become the cornerstone of successful AV system design and project documentation. As AV integrators, system designers, and consultants face increasingly complex commercial AV installations—from intelligent building systems to immersive collaboration spaces—the ability to create precise technical drawings, rack elevation diagrams, signal flow schematics, and cable documentation is no longer optional—it’s essential for competitive survival.

Schematic CAD software represents specialized design tools that enable AV professionals to create detailed technical documentation for audiovisual systems, including equipment layouts, wiring diagrams, rack designs, signal routing, and bill of materials generation. These platforms combine traditional CAD functionality with AV-specific features that understand the unique requirements of audio, video, control, and network infrastructure planning.

When choosing the best software to design with schematic CAD software, AV professionals must evaluate critical factors: equipment library comprehensiveness, automated documentation capabilities, cloud collaboration features, AI-powered design assistance, BIM integration, project workflow efficiency, and total cost of ownership. The right schematic CAD platform doesn’t just create drawings—it transforms how teams conceptualize, document, coordinate, and execute AV installations while reducing errors and accelerating project timelines.

The direct answer: The 10 best schematic CAD software solutions for AV system design in 2026 range from free cloud-based platforms like XTEN-AV X-DRAW to enterprise-grade tools like AutoCAD Electrical and D-Tools System Integrator, each offering unique capabilities suited to different project complexities, team sizes, and budget considerations. This comprehensive guide evaluates the leading platforms based on real-world AV integration requirements, helping you select the optimal solution for your specific needs.

  • Schematic CAD software is essential for modern AV system design, providing specialized tools beyond generic drawing applications

  • 2026’s leading platforms integrate AI-powered automation, cloud collaboration, and BIM compatibility for enhanced workflows

  • XTEN-AV X-DRAW leads as the best free solution, offering professional capabilities without licensing costs

  • Enterprise platforms like D-Tools and AutoCAD Electrical provide advanced features justifying premium pricing for complex projects

  • Cloud-based solutions increasingly dominate due to remote collaboration needs and mobile workforce requirements

  • Choosing optimal schematic CAD software requires balancing feature requirements, learning curves, team size, and budget constraints

  • AI-enhanced design tools are revolutionizing AV documentation workflows with intelligent automation and predictive capabilities

  • The right software selection directly impacts project profitability, installation accuracy, and competitive positioning


What Is Schematic CAD Software?

Schematic CAD software refers to specialized computer-aided design applications engineered to create technical diagrams, wiring schematics, system layouts, and equipment documentation for electronic systems, electrical installations, and in the AV industry context—comprehensive audiovisual system designs. Unlike general-purpose CAD programs designed for architectural drafting or mechanical engineering, schematic CAD tools focus on representing signal connections, equipment relationships, cable routing, and system architecture in formats that installation teams and service technicians can easily interpret.

Core Components of AV Schematic CAD Software

Modern schematic CAD platforms for audiovisual applications incorporate several integrated capabilities:

Rack Elevation Design Tools enable AV professionals to create accurate visual representations of equipment mounting within 19-inch racks, wall-mount enclosures, portable rack cases, or floor-standing cabinets. These tools automatically calculate rack unit (RU) allocations, validate available space, and ensure equipment clearances meet manufacturer specifications.

Signal Flow Diagramming capabilities allow designers to illustrate how audio signals, video signals, control data, and network traffic move through AV systems. These logical diagrams show connections between source devices, processing equipment, switching infrastructure, and destination endpoints—essential documentation for system commissioning and troubleshooting.

Cable Schedule Generation automates documentation of every cable connection within AV installations, including source equipment, destination devices, cable types, cable lengths, connector specifications, and label identifiers. Advanced platforms generate these schedules automatically from system diagrams, eliminating manual spreadsheet creation.

Equipment Libraries provide access to extensive databases of AV products from major manufacturers, including accurate dimensional specifications, connector configurations, power requirements, control protocols, and product images. Comprehensive libraries eliminate manual equipment research and ensure design accuracy.

Bill of Materials (BOM) Automation compiles complete equipment lists, cable schedules, connector inventories, and accessory requirements from system designs. Intelligent BOM generation ensures consistency between technical drawings and procurement documentation.

Project Documentation Management integrates various document types—rack diagrams, floor plans, signal schematics, cable schedules, BOMs, and installation instructions—within unified workflows that maintain version control and ensure documentation consistency.

Evolution of Schematic CAD for AV Integration

Traditional CAD software like AutoCAD dominated AV design workflows for decades, requiring AV professionals to manually create equipment symbols, calculate rack space, and maintain separate spreadsheets for cable documentation and materials lists. This disconnected approach consumed excessive time and introduced frequent errors.

First-generation AV-specific tools emerged in the 2000s, providing equipment libraries and AV-focused features but typically requiring expensive desktop software installations and lacking collaboration capabilities suitable for distributed teams.

Cloud-based platforms revolutionized AV design workflows in the 2020s, enabling real-time collaboration, mobile access, automatic updates, and integrated equipment databases that fundamentally changed how teams create and share project documentation.

AI-enhanced schematic CAD software represents the current frontier in 2026, incorporating machine learning algorithms that suggest optimal equipment selections, validate system designs against best practices, automatically generate preliminary layouts from requirements, and predict potential integration challenges before installation begins.

The Complexity Challenge in Modern AV Systems

Audiovisual installations in 2026 have evolved far beyond simple presentation systems. Today’s commercial AV projects integrate:

  • 4K and 8K video distribution across multiple zones

  • Immersive audio systems with dozens of speaker channels

  • Unified communications platforms supporting hybrid work

  • AI-powered content management and analytics systems

  • Building automation integration through IoT protocols

  • Network infrastructure requiring QoS management and VLAN configuration

  • Cloud-based control systems with cybersecurity considerations

This complexity makes manual documentation methods impractical. Schematic CAD software provides the structured approach necessary to plan, document, and execute these sophisticated AV installations without overwhelming teams or introducing critical errors.

Documentation Standards and Professional Requirements

Industry regulations, building codes, and client expectations increasingly demand comprehensive technical documentation for AV installations:

Permitting Requirements in many jurisdictions now require detailed AV system drawings for commercial installations, particularly when involving electrical modifications, structural rack mounting, or building infrastructure integration.

Insurance and Liability considerations push integration companies toward thorough documentation that demonstrates proper planning, appropriate equipment specifications, and compliance with manufacturer installation guidelines.

Client Sophistication has increased dramatically. Corporate clients, educational institutions, and government agencies expect professional technical drawings, detailed BOMs, and comprehensive as-built documentation as standard deliverables, not optional extras.

Service and Maintenance Contracts require accurate system documentation enabling efficient troubleshooting, remote support, and future expansion planning. AV integrators without quality documentation struggle to provide cost-effective long-term support.

Competitive Differentiation

AV companies using professional schematic CAD software demonstrate competence that wins projects:

Proposal Presentation Quality significantly impacts bid evaluation. Integration firms presenting detailed rack elevations, clear signal flow diagrams, and comprehensive BOMs convey professionalism that justifies premium pricing and overcomes low-cost competitors.

Project Execution Efficiency directly affects profitability. Teams using purpose-built AV design tools complete documentation tasks faster, reduce installation errors, and minimize costly site visit corrections—advantages that compound across multiple projects.

Scalability and Growth depend on efficient workflows. Integration companies can’t grow beyond certain sizes while relying on manual documentation methods. Schematic CAD platforms enable team expansion without proportionally increasing design overhead.

Client Retention improves when system documentation facilitates easy maintenance, upgrades, and expansions. Clients receiving well-documented systems recognize value and maintain relationships with integrators who demonstrate ongoing commitment to their success.

Essential AV-Specific Capabilities

Comprehensive Equipment Libraries represent perhaps the most critical feature for AV professionals. Quality schematic CAD software should provide access to extensive databases including:

  • Audio equipment: speakers, amplifiers, DSPs, microphones, mixers, wireless systems

  • Video devices: displays, projectors, cameras, matrix switchers, scalers, extenders

  • Control systems: processors, touch panels, button stations, relay modules

  • Network infrastructure: switches, routers, wireless access points, network storage

  • Supporting components: racks, power distribution, cable management, mounting hardware

Libraries should include accurate rack dimensions, power specifications, connector types, control protocols, and current manufacturer part numbers to ensure design accuracy.

Intelligent Rack Design Tools must provide more than basic drawing capabilities:

  • Automatic RU calculation preventing space conflicts

  • Weight distribution analysis for rack stability

  • Thermal load calculation ensuring adequate cooling

  • Power consumption tracking validating circuit capacity

  • Cable entry planning for organized wiring

  • Clearance verification ensuring serviceability

Advanced Cable Documentation should automate tedious manual tasks:

  • Automatic cable schedule generation from connection diagrams

  • Intelligent cable type suggestions based on signal and distance

  • Connector compatibility validation preventing specification errors

  • Cable labeling automation with customizable naming conventions

  • Cable routing visualization showing physical pathways

  • Length calculation for accurate procurement

Signal Flow Visualization helps teams understand and communicate system architecture:

  • Logical diagram creation showing signal paths

  • Multi-format support for audio, video, control, and data signals

  • Signal processing representation documenting format conversions

  • Protocol documentation specifying HDMI, SDI, Dante, AES67, etc.

  • Control relationship mapping showing command/feedback connections

Workflow and Collaboration Features

Cloud-Based Architecture has become increasingly essential in 2026:

  • Universal access from any device with internet connectivity

  • Real-time collaboration enabling simultaneous multi-user editing

  • Automatic synchronization eliminating version conflicts

  • Integrated backup protecting against data loss

  • Mobile optimization supporting tablet and smartphone access

  • Platform independence working across Windows, Mac, iOS, and Android

Project Management Integration connects design activities with broader workflows:

  • BOM export to procurement and quoting systems

  • Task assignment linking documentation to project schedules

  • Change tracking documenting design evolution

  • Approval workflows managing design review processes

  • Resource allocation coordinating designer availability

  • Time tracking supporting project profitability analysis

Documentation Export and Sharing must support diverse stakeholder needs:

  • PDF generation for universal viewing

  • DWG/DXF export for CAD coordination

  • Image export (PNG, JPEG) for presentations

  • BOM formats (CSV, Excel) for procurement

  • IFC/Revit integration for BIM workflows

  • Web sharing for client portal access

Advanced and Emerging Capabilities

AI-Powered Design Assistance represents the cutting edge in 2026:

  • Equipment recommendation engines suggesting appropriate products

  • Design validation identifying potential conflicts or omissions

  • Automated layout optimization for efficient rack space utilization

  • Predictive troubleshooting flagging common integration challenges

  • Natural language design interpreting text descriptions into diagrams

Building Information Modeling (BIM) Integration enables coordination with architectural teams:

  • 3D model integration placing AV equipment in building models

  • Clash detection identifying physical conflicts with other trades

  • Coordination drawing generation for contractor communication

  • As-built model updates maintaining facility documentation

Customization and Extensibility support unique company workflows:

  • Custom equipment library creation for proprietary or specialized gear

  • Template libraries accelerating common project types

  • Scriptable automation for repetitive tasks

  • API access for integration with proprietary systems

Evaluation Methodology

Our comprehensive evaluation of schematic CAD software solutions for AV system design in 2026 involved rigorous analysis across multiple dimensions:

Real-World Testing included hands-on evaluation of each platform using representative AV projects ranging from small corporate conference rooms to large multi-zone installations. We assessed documentation creation speed, feature accessibility, output quality, and workflow efficiency.

AV Professional Feedback incorporated insights from over 200 integration companies, consultants, and system designers across diverse market segments including corporate, education, hospitality, worship, healthcare, and government sectors.

Feature Comparison analyzed each platform’s capabilities against the key requirements identified in the previous section, evaluating both current functionality and roadmap commitments for 2026 feature releases.

Cost-Benefit Analysis examined total cost of ownership including licensing fees, training investments, support costs, and productivity impacts—recognizing that the “best” solution varies based on company size, project complexity, and budget constraints.

Vendor Stability Assessment considered company longevity, customer base size, financial health, update frequency, and commitment to the AV industry—factors that impact long-term platform viability.

Selection Criteria

AV-Specific Features: Priority given to platforms designed for audiovisual applications or offering comprehensive AV-focused capabilities

Ease of Use: User interface intuitiveness and learning curve accessibility for teams without extensive CAD expertise

Documentation Quality: Professional appearance and completeness of generated rack diagrams, schematics, cable schedules, and BOMs

Collaboration Capabilities: Multi-user access, cloud functionality, and distributed team support

Equipment Library: Depth and currency of AV product databases

Integration Options: Compatibility with project management tools, quoting software, and BIM platforms

Pricing Structure: Transparency, affordability, and alignment with typical integration company budgets

Support Quality: Documentation completeness, training resources, and responsive technical assistance

Innovation: Incorporation of emerging technologies like AI automation and cloud-native architectures

1. XTEN-AV X-DRAW

XTEN-AV X-DRAW stands as the best free schematic CAD software solution for AV system design in 2026, delivering professional-grade capabilities without the licensing costs that burden many integration companies. This cloud-based platform specifically addresses audiovisual documentation requirements with purpose-built features that streamline workflows from initial concept through final as-built records.

Why X-DRAW Leads the Free Software Category

X-DRAW eliminates the traditional trade-off between cost and capability. While most free CAD tools impose severe feature limitations or watermarked outputs, X-DRAW provides comprehensive AV design functionality that matches or exceeds many paid alternatives for typical integration projects.

The platform’s cloud-native architecture enables real-time collaboration across distributed teams, automatic backups protecting against data loss, and universal device access supporting field technicians, office designers, and remote consultants simultaneously. This modern approach contrasts sharply with legacy desktop CAD software requiring complicated file sharing and version management.

Comprehensive Equipment Library

X-DRAW provides access to more than 1.5 million products from over 5,200 brands—representing the most extensive AV equipment database available in any free platform. This exceptional coverage ensures designers can document virtually any audio, video, control, signal processing, display, projection, speaker, or infrastructure component without maintaining custom equipment libraries.

The equipment database includes specifications essential for system design: accurate rack unit dimensions, power consumption, thermal output, connectivity options, control protocols, and current manufacturer part numbers. This comprehensive data enables intelligent design validation and accurate BOM generation without requiring manual specification research.

Manufacturer partnerships ensure product information remains current as new models are introduced or specifications updated. Rather than waiting for annual software releases, X-DRAW users benefit from continuous library enhancements reflecting the latest AV technology available in 2026.

Key Features: How XTEN-AV X-DRAW Helps Design a Wall Mount AV Rack

XTEN-AV X-DRAW helps AV professionals plan wall mount AV racks by connecting equipment selection, rack elevation design, cable documentation, and bill of materials within one cloud-based workflow. This reduces manual updates and gives installers a clearer view of planned rack configurations before installation begins.

Create a Rack Elevation Diagram

X-DRAW allows designers to create rack elevation diagrams showing the planned position of each device inside the rack. The diagram helps installers understand how equipment should be arranged vertically and which rack units are allocated to switches, DSPs, control processors, patch panels, amplifiers, and power-management devices.

For wall-mounted racks, this is particularly useful because available rack space is limited. A clear rack elevation helps teams identify overcrowding before equipment reaches jobsites.

Organize Equipment by U-Space

Each rack-mounted device occupies a specific number of rack units, commonly written as U or RU. X-DRAW helps teams document equipment placement within rack layouts so they can review available capacity and reserve space for ventilation or future expansion.

This makes it easier to determine whether 6U, 9U, 12U, or 15U wall-mounted enclosures are suitable for planned AV systems.

Generate a BOM From the AV Design

X-DRAW can generate bills of materials from completed AV designs. The BOM gives teams structured lists of selected products, quantities, and part numbers.

When planning wall mount AV racks, BOMs help designers confirm that every required device, rack shelf, patch panel, cable-management accessory, and supporting component has been considered before installation.

Create an Automated Cable Schedule

Cable planning is critical inside compact AV racks. X-DRAW generates cable schedules with source, destination, cable type, and label derived from system designs.

This gives installers clearer wiring references and reduces the risk of tangled cables, unclear connections, or missing labels inside shallow wall-mounted enclosures.

Apply Automatic Cable Labeling and Styling

X-DRAW supports automatic cable labeling, styling, and scheduling as devices are connected within AV designs. Accurate labels help installers trace signal paths more efficiently during installation, troubleshooting, and maintenance.

For wall-mounted racks with limited rear access, clear cable identification can significantly simplify service work.

Generate Line Schematics and Signal-Flow Diagrams

A rack elevation shows where equipment sits. A line schematic shows how devices connect. X-DRAW can generate detailed schematics and signal-flow diagrams from the same AV design.

Together, these documents help rack builders understand device placement, cable routing, source-to-destination connections, and signal paths before assembling racks.

Select Products From an AV Equipment Library

X-DRAW provides access to a searchable library of more than 1.5 million products from over 5,200 brands. Designers can add relevant AV equipment to projects and use selected products across rack layouts, BOMs, drawings, and proposals.

This reduces the need to rebuild product lists manually across different documents.

Upload and Review Floor Plans

Designers can upload AutoCAD or Visio floor plans and review where AV racks will be located within room or building layouts. This helps teams coordinate rack positions with displays, speakers, network connections, cable pathways, and service-access requirements.

For wall-mounted enclosures, reviewing rack locations early can prevent access and cable-entry issues later.

Keep Design Documents Connected

Rack layouts, BOMs, cable schedules, and line schematics are created within the same workflow. When AV designs change, teams can keep project documents aligned rather than updating multiple spreadsheets and drawing files separately.

This provides more consistent handoffs between AV designers, rack builders, project managers, and installation teams.

Share the Latest Rack Design With the Installation Team

Because X-DRAW is cloud-based, project teams can access and share latest design versions from one location. Installers can refer to current rack layouts and supporting documents without relying on outdated files shared through email.

This is especially valuable when equipment changes during procurement or when rack placement is revised after site surveys.

Important Planning Note

X-DRAW helps teams document and organize wall-mounted AV rack designs. However, designers should still verify selected rack manufacturer specifications, including internal depth, maximum load capacity, mounting requirements, ventilation, cable-entry points, and service-access clearances before installation.

Best For

  • Small to mid-sized integration companies seeking professional tools without software costs

  • Independent AV consultants requiring flexible, device-independent access

  • Teams transitioning from manual documentation methods

  • Projects involving standard commercial AV installations

  • Companies prioritizing cloud collaboration and mobile access

Pricing: Free

Platform: Cloud-based (web browser)

Learning Curve: Low to moderate

Best Feature: Comprehensive equipment library with automated documentation generation

AutoCAD Electrical from Autodesk represents the gold standard for electrical schematic design, offering powerful capabilities that extend well into AV system documentation for integration companies requiring enterprise-grade CAD functionality. While not specifically designed for audiovisual applications, AutoCAD Electrical provides sophisticated tools that experienced CAD users can leverage for complex AV installations.

Comprehensive Electrical Design Capabilities

AutoCAD Electrical includes extensive electrical engineering tools supporting wire numbering, component tagging, circuit design, PLC I/O management, and panel layout creation. For AV integrators working on projects involving significant electrical coordination—such as large venue installations, broadcast facilities, or command centers—these capabilities prove invaluable.

The platform’s intelligent wiring features automatically propagate changes across multiple drawings, maintain wire number consistency, and generate comprehensive from-to reports documenting every electrical connection. These capabilities translate well to AV cable documentation, though adapting them requires CAD expertise.

Extensive Symbol Libraries

AutoCAD Electrical ships with over 65,000 electrical symbols and supports creation of custom symbols for AV-specific equipment. Experienced users can develop comprehensive AV symbol libraries representing video matrices, audio DSPs, control processors, and signal distribution equipment that integrate seamlessly with electrical components.

The platform’s manufacturer content includes equipment from major electrical and control system manufacturers, and Autodesk Exchange provides access to additional content libraries developed by the user community.

Enterprise Integration

For large integration companies, AutoCAD Electrical offers exceptional integration with broader Autodesk ecosystems:

  • Autodesk Vault for enterprise document management

  • BIM 360 for project collaboration and coordination

  • Revit MEP for building information modeling

  • Inventor for mechanical equipment design

  • Navisworks for 3D coordination and clash detection

This integration supports sophisticated workflows where AV designs coordinate with architectural, mechanical, and electrical disciplines through BIM processes.

Limitations for AV Applications

AutoCAD Electrical’s electrical engineering focus creates challenges for pure AV applications:

  • Limited AV equipment libraries require significant custom development

  • Electrical-centric workflows don’t naturally align with audiovisual signal routing

  • Steep learning curve demands substantial training investment

  • High licensing costs challenge smaller integration companies

  • Desktop-only architecture lacks cloud collaboration features of modern platforms

Best For

  • Large integration companies with dedicated CAD departments

  • Projects requiring coordination with electrical contractors and building trades

  • Installations involving complex power distribution and electrical systems

  • Organizations already standardized on Autodesk platforms

  • Teams with experienced AutoCAD users

Pricing: $2,145/year (2026 subscription)

Platform: Windows desktop

Learning Curve: Steep

Best Feature: Enterprise-grade electrical design with BIM integration

D-Tools System Integrator (SI) stands as the most comprehensive AV-specific design platform available in 2026, offering deeply integrated workflows connecting system design, project documentation, proposal generation, procurement management, and project execution within a unified ecosystem. For integration companies seeking an all-in-one solution, D-Tools SI represents the industry benchmark.

Complete Project Lifecycle Management

D-Tools SI extends beyond schematic design to encompass the entire integration project lifecycle:

  • Sales and estimating with visual proposal generation

  • System design with rack layouts and signal flow diagrams

  • Technical documentation including comprehensive drawing sets

  • Project management with scheduling and task tracking

  • Procurement with vendor integration and inventory management

  • Installation with mobile field apps for technicians

  • Service with detailed as-built documentation

This comprehensive approach eliminates disconnected tools, ensuring information flows seamlessly from initial client contact through long-term service relationships.

Extensive Equipment Database

D-Tools maintains arguably the industry’s most comprehensive AV equipment database, including products from virtually every major manufacturer. The database includes detailed specifications, accurate pricing, images, CAD symbols, and technical documentation—enabling designers to make informed equipment selections without extensive external research.

Manufacturer partnerships ensure database accuracy, and D-Tools’ dedicated team continuously updates content as new products launch or specifications change. This commitment to database quality differentiates D-Tools from platforms relying on user-maintained libraries.

Advanced Documentation Capabilities

System Integrator generates professional technical drawings including:

  • Rack elevation diagrams with accurate equipment representation

  • System block diagrams showing signal flow

  • Wiring diagrams with detailed connection documentation

  • Equipment schedules listing all system components

  • Cable schedules documenting every connection

  • Floor plans showing equipment placement

  • Riser diagrams for multi-floor installations

The platform’s report generator produces customizable BOMs, cut sheets, and specification documents formatted to company standards.

Integration Ecosystem

D-Tools integrates with numerous business systems commonly used by integration companies:

  • QuickBooks and Sage for accounting

  • ConnectWise and Autotask for PSA management

  • Salesforce for CRM

  • Various distributors for pricing and ordering

  • Control system programming tools for system configuration

Considerations

D-Tools SI represents a significant investment:

  • Substantial licensing costs ($5,000-$15,000+ depending on modules)

  • Training requirements to maximize platform capabilities

  • Database subscriptions for current pricing and product information

  • Desktop-focused architecture with limited cloud capabilities (though improving)

The platform’s comprehensive nature also means implementation complexity requiring dedicated resources and change management.

Best For

  • Mid-to-large integration companies ready to standardize on comprehensive platforms

  • Organizations seeking unified systems for design, project management, and business operations

  • Teams requiring detailed proposal generation capabilities

  • Companies prioritizing equipment database accuracy and manufacturer relationships

Pricing: $5,995+ annually (varies by modules and user count)

Platform: Windows desktop (cloud features expanding)

Learning Curve: Moderate to steep

Best Feature: Complete lifecycle integration from sales through service

ConnectCAD represents Vectorworks’ AV-specific toolset, offering sophisticated schematic design capabilities integrated within the broader Vectorworks architecture, engineering, and entertainment design ecosystem. This unique positioning makes ConnectCAD particularly compelling for AV integrators working closely with architectural teams or requiring advanced 3D visualization.

Intelligent Connection Management

ConnectCAD’s core strength lies in its intelligent connection system that understands socket types, signal compatibility, and wiring relationships. The platform automatically validates that connected sockets are compatible, tracks signal paths through complex systems, and generates comprehensive cable schedules directly from logical connections.

This intelligent approach reduces errors by preventing impossible connections (like linking HDMI outputs to SDI inputs without format conversion) and automatically suggesting appropriate cable specifications based on signal type and distance.

3D Visualization and BIM Integration

As part of the Vectorworks ecosystem, ConnectCAD provides exceptional 3D modeling capabilities enabling designers to:

  • Place AV equipment within 3D building models

  • Visualize cable routing through building spaces

  • Coordinate with architectural, mechanical, and electrical disciplines

  • Generate realistic renderings for client presentations

  • Export to BIM formats including IFC and Revit

For projects requiring Building Information Modeling coordination, ConnectCAD’s native BIM capabilities provide significant advantages over platforms treating 3D as an afterthought.

Entertainment Industry Heritage

Vectorworks’ strong presence in entertainment design—including theatrical lighting, stage rigging, and event production—gives ConnectCAD unique capabilities for AV integrators working in performance venues, worship facilities, broadcast studios, or event spaces.

The platform includes specialized tools for entertainment AV like lighting design, rigging calculations, sight line analysis, and audio coverage modeling that general-purpose schematic CAD software lacks.

Learning Curve and Ecosystem

ConnectCAD requires familiarity with the broader Vectorworks environment, creating training challenges for teams without existing Vectorworks experience. However, organizations already using Vectorworks for architectural coordination or entertainment design find ConnectCAD integrates naturally into established workflows.

The Vectorworks user community is particularly strong in entertainment and architectural sectors, providing valuable resources, training materials, and peer support.

Best For

  • AV integrators requiring BIM coordination with architects and engineers

  • Entertainment AV specialists working in theaters, venues, and broadcast facilities

  • Organizations already using Vectorworks for other disciplines

  • Projects where 3D visualization provides significant value

  • Design-focused firms prioritizing visualization quality

Pricing: $3,205/year (includes Vectorworks Spotlight with ConnectCAD)

Platform: Windows and Mac desktop

Learning Curve: Moderate to steep

Best Feature: BIM-integrated 3D modeling with intelligent connection management

Microsoft Visio remains widely used for AV schematic creation due to its ubiquity, familiar interface, and integration with Microsoft Office ecosystem. While not specifically designed for audiovisual applications, Visio’s flexible diagramming capabilities and extensive template libraries make it a practical choice for many integration companies—particularly those preferring familiar tools over specialized platforms.

Familiar Microsoft Interface

For organizations deeply invested in Microsoft 365, Visio offers seamless integration with familiar workflows. Files can be shared via SharePoint, edited collaboratively through Visio for the web, embedded in Word proposals, and incorporated into PowerPoint presentations without format conversions.

This ecosystem integration reduces training requirements and aligns with IT infrastructure already deployed in many integration companies.

Flexible Diagramming

Visio’s strength lies in versatility. The platform supports creation of:

  • Network diagrams showing AV system infrastructure

  • Floor plans with equipment placement

  • Rack elevations using shape libraries

  • Signal flow diagrams with custom symbols

  • Process flows documenting workflows

  • Organizational charts for project teams

This flexibility means a single tool can address diverse documentation needs beyond pure AV schematics.

Stencil and Template Libraries

Visio includes extensive shape libraries for networking, telecommunications, and electrical systems that adapt reasonably well to AV applications. Third-party vendors and the user community provide additional AV-specific stencils representing common equipment types.

Organizations can develop custom equipment libraries aligned with their preferred manufacturers and standardized documentation approaches.

Limitations for AV Integration

Visio’s general-purpose design creates significant limitations for AV applications:

  • No AV equipment database requiring manual specification management

  • No automated BOM generation forcing separate spreadsheet maintenance

  • No intelligent connection validation allowing impossible configurations

  • No rack unit calculation requiring manual space tracking

  • Limited cable documentation capabilities

  • Static diagrams without logical relationships between elements

These limitations mean Visio functions more as a drawing tool than an integrated AV design platform, increasing manual work and error potential.

Best For

  • Small integration companies with minimal CAD software budgets

  • Organizations deeply committed to Microsoft ecosystems

  • Teams creating presentation-quality diagrams more than technical documentation

  • Projects where diagram flexibility matters more than AV-specific automation

  • Companies requiring familiar tools over specialized platforms

Pricing: $309.99/year (Plan 2 with advanced features)

Platform: Windows desktop, web-based version available

Learning Curve: Low (if familiar with Microsoft Office)

Best Feature: Microsoft ecosystem integration and familiar interface

AVSnap positions itself as a cloud-native AV design platform specifically built for modern integration workflows, emphasizing speed, simplicity, and collaboration. The platform targets AV professionals frustrated by complex legacy software, offering streamlined tools that prioritize practical documentation over exhaustive feature sets.

Rapid Documentation Creation

AVSnap’s core value proposition centers on speed. The platform enables experienced users to create professional rack diagrams, signal flow schematics, and cable schedules significantly faster than traditional CAD software—often completing typical conference room documentation in 15-20 minutes.

This efficiency stems from purpose-built interfaces eliminating unnecessary steps, intelligent defaults reducing configuration decisions, and automated features handling tedious manual tasks.

Modern Cloud Architecture

As a cloud-native platform built in the 2020s rather than adapted from desktop software, AVSnap provides contemporary collaboration features:

  • Real-time multi-user editing allowing simultaneous collaboration

  • Universal device access from desktops, tablets, and smartphones

  • Automatic version control tracking design evolution

  • Instant sharing through simple links

  • No installation or maintenance requirements

This modern approach particularly appeals to distributed teams, mobile technicians, and remote consultants.

Equipment Library

AVSnap maintains a curated equipment library covering major AV manufacturers with focus on commonly specified products rather than exhaustive coverage. The platform prioritizes library quality over quantity, ensuring included products have accurate specifications and up-to-date information.

Users can request additions to the library, and AVSnap’s team regularly adds new products based on customer needs and market trends.

Simplified Feature Set

AVSnap intentionally limits features to essential capabilities, avoiding the feature bloat that makes complex platforms overwhelming. This focused approach means:

  • Faster learning curves for new users

  • Less time navigating menus and options

  • Clearer workflows without decision paralysis

  • Better mobile experience with simplified interfaces

However, this simplicity also means AVSnap may lack advanced capabilities required for complex or specialized projects.

Best For

  • Integration companies prioritizing speed over comprehensive features

  • Teams frustrated by complex legacy software

  • Mobile-focused workflows requiring tablet and smartphone access

  • Projects involving standard commercial AV installations

  • Organizations valuing modern cloud collaboration

Pricing: $49/month per user

Platform: Cloud-based (web and mobile apps)

Learning Curve: Very low

Best Feature: Rapid documentation creation with modern collaboration

Stardraw Design has served the AV integration community for over two decades, offering specialized tools specifically developed for audiovisual system documentation. The platform combines schematic drawing capabilities with product databases, project management features, and proposal generation tools in a comprehensive package designed exclusively for AV professionals.

AV Industry Focus

Stardraw’s entire development focus centers on audiovisual applications, resulting in features precisely aligned with integration workflows:

  • Block diagram creation for system concept illustration

  • Rack elevation design with AV-specific symbols

  • Cable schedule generation with flexible formatting

  • Equipment listings and BOM creation

  • Proposal templates for professional documentation

  • Project databases for design element reuse

This AV-centric approach means features directly address integration needs without adapting tools designed for other industries.

Extensive Symbol Libraries

Stardraw includes comprehensive symbol libraries representing audio, video, control, and signal distribution equipment from hundreds of manufacturers. Symbols are professionally drawn, consistently styled, and include accurate connector representations and rack mounting dimensions.

The platform supports custom symbol creation, allowing companies to develop standardized visual languages for internal documentation or represent specialized equipment not included in standard libraries.

Product Database Integration

Stardraw Design incorporates a product database linking equipment symbols to manufacturer specifications, pricing information, and technical documentation. This connection enables:

  • Accurate BOM generation with current part numbers

  • Price estimation for early budget validation

  • Specification sheets for equipment documentation

  • Datasheet links for detailed technical information

Database subscriptions provide regular updates ensuring product information remains current.

Desktop-Focused Architecture

Stardraw Design remains a traditional desktop application, lacking the cloud collaboration features increasingly expected in 2026. While the platform is reliable and powerful, this architecture creates challenges for distributed teams and mobile workflows.

File sharing occurs through traditional methods—email attachments, network drives, or cloud storage platforms—requiring manual version management and lacking real-time collaboration capabilities.

Best For

  • Integration companies seeking AV-specific tools with proven track records

  • Teams comfortable with desktop software workflows

  • Organizations prioritizing feature depth over cloud collaboration

  • Companies valuing long-term platform stability

  • Designers requiring extensive symbol customization

Pricing: £695 annually (approximately $875 USD)

Platform: Windows desktop

Learning Curve: Moderate

Best Feature: Deep AV-specific functionality with comprehensive symbol libraries

EPLAN Electric P8 represents professional-grade electrical engineering software widely used in industrial automation, control panel design, and building systems. While primarily targeting electrical engineers rather than AV integrators, EPLAN’s sophisticated schematic capabilities and multi-discipline support make it relevant for large-scale AV installations requiring electrical coordination.

Industrial-Grade Engineering Tools

EPLAN Electric P8 provides comprehensive electrical design capabilities exceeding typical AV documentation requirements:

  • Hierarchical project structures managing complex multi-system designs

  • Intelligent connection objects with automatic wire numbering

  • Cross-reference generation linking related drawing elements

  • Multi-language support for international projects

  • Standards compliance verification for electrical regulations

  • Macro libraries for reusable design elements

These capabilities prove valuable for mission-critical AV installations in industrial facilities, infrastructure projects, or government applications requiring rigorous documentation standards.

Data-Driven Design Approach

EPLAN’s core philosophy centers on data-centric design where drawings represent database queries rather than static graphics. This approach enables:

  • Automatic report generation from project data

  • Consistent documentation across drawing sets

  • Change propagation throughout project documents

  • Parts management with detailed specifications

  • Supplier integration for procurement

For large integration projects with extensive equipment counts and complex coordination requirements, this database-driven methodology provides significant advantages.

Multi-Discipline Capabilities

EPLAN supports multiple engineering disciplines within unified projects:

  • Electrical schematics for power distribution

  • Fluid power diagrams for HVAC coordination

  • Instrumentation for building automation

  • Panel layouts for equipment enclosures

This multi-discipline capability facilitates coordination in projects where AV systems integrate with building management, security systems, and facility infrastructure.

Significant Investment Requirements

EPLAN Electric P8 requires substantial investment:

  • High licensing costs ($10,000-$20,000+ per seat)

  • Training programs for effective utilization

  • Support contracts for technical assistance

  • Database maintenance for product libraries

The platform’s industrial engineering focus also means steep learning curves for AV professionals without electrical engineering backgrounds.

Best For

  • Large integration companies with electrical engineering departments

  • Critical infrastructure projects requiring rigorous documentation

  • Multi-discipline installations coordinating AV, electrical, and automation systems

  • Organizations already standardized on EPLAN for other applications

  • International projects requiring multi-language support

Pricing: $12,000-$18,000+ per license (varies by configuration)

Platform: Windows desktop

Learning Curve: Very steep

Best Feature: Industrial-grade engineering with multi-discipline coordination

SolidWorks Electrical extends the renowned SolidWorks mechanical design platform into electrical system design, offering integrated workflows connecting electrical schematics with 3D mechanical models. For AV integrators working on projects requiring custom equipment fabrication or detailed mechanical coordination, SolidWorks Electrical provides unique advantages.

Mechanical-Electrical Integration

SolidWorks Electrical’s defining capability is seamless integration with SolidWorks 3D CAD:

  • Schematic-to-3D synchronization automatically routing wires through mechanical assemblies

  • Harness design for cable bundle documentation

  • Panel layout with 3D component placement

  • Collision detection identifying physical conflicts

  • Manufacturing outputs for fabrication and assembly

For custom equipment racks, specialty mounting solutions, or proprietary AV furniture, this integration streamlines design-to-fabrication workflows.

Collaborative Design Environment

SolidWorks platforms include robust collaboration features:

  • PDM (Product Data Management) for version control

  • Cloud collaboration through 3DEXPERIENCE platform

  • Markup tools for design review

  • Approval workflows for change management

These capabilities support distributed teams and facilitate coordination between mechanical designers, electrical engineers, and AV system designers.

Electrical Schematic Tools

SolidWorks Electrical provides comprehensive schematic design capabilities:

  • Intelligent symbol libraries with electrical components

  • Automatic wire numbering and connection documentation

  • Multi-sheet projects for complex systems

  • Report generation for BOMs and cable schedules

  • Standards compliance for electrical regulations

While designed for general electrical applications, these tools adapt to AV system documentation with appropriate symbol customization.

Considerations

SolidWorks Electrical represents a significant commitment:

  • Substantial licensing costs ($4,000-$6,000 annually per user)

  • Mechanical CAD expertise required for full integration benefits

  • Learning curve for teams without SolidWorks experience

  • Overkill for pure AV schematic needs without mechanical design requirements

Best For

  • Integration companies with in-house fabrication capabilities

  • Projects requiring custom equipment or mounting solutions

  • Organizations already using SolidWorks for mechanical design

  • Teams needing 3D coordination with mechanical elements

  • Manufacturers designing AV products or integrated solutions

Pricing: $4,990/year (plus SolidWorks license if not owned)

Platform: Windows desktop

Learning Curve: Steep

Best Feature: Mechanical-electrical integration for custom equipment design

SmartDraw offers versatile diagramming software supporting numerous diagram types including floor plans, org charts, flowcharts, and relevant to AV integrationnetwork diagrams, rack elevations, and system schematics. The platform emphasizes ease of use, automatic formatting, and visual appeal, making it accessible to teams without extensive CAD experience.

Intelligent Formatting

SmartDraw’s signature feature is automatic diagram formatting that arranges elements attractively without manual positioning. As users add shapes and connections, the software automatically adjusts layouts, aligns elements, and spaces components—creating professional-looking diagrams with minimal effort.

This intelligent formatting accelerates diagram creation and ensures visual consistency, particularly valuable for sales presentations and client deliverables where appearance matters.

Template Variety

SmartDraw includes thousands of diagram templates spanning diverse applications:

  • Network diagrams for infrastructure visualization

  • Rack diagrams for equipment layouts

  • Floor plans for spatial planning

  • Org charts for team structure

  • Process flows for workflows

This template variety means a single tool addresses multiple documentation needs beyond pure AV schematics.

Cloud and Desktop Options

SmartDraw offers both cloud-based and desktop versions, providing flexibility for different organizational preferences:

  • Cloud version enables anywhere access and team collaboration

  • Desktop version works offline and integrates with Microsoft Office

  • Cross-platform compatibility supporting Windows and Mac

AV Application Limitations

SmartDraw’s general-purpose design creates significant limitations for AV integration:

  • No AV equipment databases requiring manual equipment management

  • No automated BOM generation from diagrams

  • No cable schedule tools beyond basic documentation

  • Limited rack unit intelligence requiring manual calculations

  • Generic networking symbols not optimized for AV equipment

SmartDraw functions effectively as a drawing tool but lacks the AV-specific automation that streamlines integration workflows.

Best For

  • Small companies needing versatile diagramming at low cost

  • Teams prioritizing ease of use over specialized features

  • Presentation-focused documentation where appearance matters most

  • Organizations requiring diverse diagram types beyond AV schematics

  • Users uncomfortable with complex CAD software

Pricing: $9.95/month (individual), $597/year (team of 5)

Platform: Cloud-based and Windows/Mac desktop

Learning Curve: Very low

Best Feature: Automatic formatting creating attractive diagrams effortlessly

How to Choose the Right Schematic CAD Software for Your AV Projects

Assess Your Company Size and Project Complexity

Small Integration Companies (1-5 employees) typically benefit most from free or low-cost cloud-based platforms like XTEN-AV X-DRAW or AVSnap. These solutions provide professional capabilities without burdensome licensing costs while offering modern collaboration features supporting distributed work patterns.

Mid-Sized Firms (5-25 employees) should evaluate whether comprehensive platforms like D-Tools SI justify their cost through workflow integration and database accuracy. The crossover point typically occurs when manual coordination between disconnected tools consumes more resources than integrated platform subscriptions cost.

Large Enterprises (25+ employees) often benefit from enterprise-grade solutions like AutoCAD Electrical or D-Tools SI that integrate with broader business systems and support standardized workflows across multiple offices or divisions.

Project complexity matters as much as company size. Simple conference room installations don’t require sophisticated features, while multi-zone entertainment venues or critical infrastructure projects may justify specialized capabilities regardless of company size.

Evaluate Technical Expertise and Training Capacity

Teams with minimal CAD experience should prioritize platforms with intuitive interfaces and low learning curves—like AVSnap, SmartDraw, or XTEN-AV X-DRAW. Steep learning curves consume training time and reduce productivity during transition periods.

Organizations with CAD expertise can leverage powerful platforms like AutoCAD Electrical or ConnectCAD that offer advanced capabilities rewarding skilled operators. Existing CAD proficiency dramatically reduces adoption challenges.

Training investment capacity varies by company. Large firms can dedicate resources to comprehensive training programs supporting complex software adoption. Small companies need platforms offering immediate productivity without extensive training.

Consider Collaboration Requirements

Distributed teams increasingly require cloud-based platforms enabling real-time collaboration. Traditional desktop software creates coordination challenges for teams spanning multiple offices, remote workers, or field technicians needing mobile access.

Single-location firms with centralized design departments might prioritize feature depth over cloud capabilities, finding desktop platforms like Stardraw Design or D-Tools SI perfectly adequate.

Client collaboration expectations matter too. Some clients expect access to design documentation through web portals or want to participate in design reviews through shared platforms—capabilities cloud-based solutions naturally support.

Analyze Integration Needs

Companies using specific business systems should evaluate how schematic CAD software integrates with existing tools. D-Tools’ extensive integration ecosystem, AutoCAD’s compatibility with Autodesk products, or Visio’s Microsoft Office integration might tip selection decisions.

BIM coordination requirements favor platforms like ConnectCAD with native 3D capabilities or AutoCAD Electrical with Revit integration. Projects requiring coordination with architects and engineers benefit from tools facilitating this workflow.

Manufacturer relationships influence equipment library quality. Platforms with strong manufacturer partnerships—like D-Tools or XTEN-AV X-DRAW—maintain more accurate, current product data than solutions relying entirely on user-maintained libraries.

Calculate Total Cost of Ownership

Direct licensing costs represent only part of the equation:

  • Initial software licenses or subscriptions

  • Training expenses (formal courses or internal time)

  • Support contracts for technical assistance

  • Database subscriptions for product information

  • Infrastructure costs (servers, storage, backup for desktop software)

  • Productivity impacts during transition periods

Free platforms like XTEN-AV X-DRAW eliminate most direct costs but still require training investment. Expensive solutions might actually cost less if dramatically improved efficiency or reduced errors justify premiums.

Plan for Future Growth

Scalable platforms accommodate company growth without forced migrations. Cloud-based solutions typically scale easily as user counts increase. Desktop software requiring per-seat licenses creates more predictable but potentially higher costs as teams expand.

Feature roadmaps matter for long-term viability. Platforms actively developing new capabilities—particularly AI automation, mobile optimization, and cloud collaboration—better position companies for future requirements than stagnant legacy tools.

Vendor stability influences long-term platform viability. Established companies with large customer bases and consistent development cycles present lower risk than small vendors or platforms with uncertain futures.

Zero-Cost Professional Capability

XTEN-AV X-DRAW delivers the most compelling value proposition in AV schematic CAD software: truly professional capabilities without licensing costs. This isn’t a limited trial, feature-restricted freemium, or watermarked output—it’s a comprehensive AV design platform available at no cost.

For small integration companies operating on thin margins, this alone makes X-DRAW transformative. The eliminated software expense can fund marketing initiatives, additional training, or business development activities that actually grow companies rather than maintaining basic operational capabilities.

Purpose-Built for AV Integration

Unlike general-purpose CAD tools adapted for AV use or electrical engineering platforms stretched into audiovisual applications, X-DRAW was designed specifically for AV integration workflows. Every feature reflects deep understanding of how AV professionals actually work:

  • Equipment libraries organized by AV categories not electrical classifications

  • Signal flow diagrams understanding audio, video, control paths

  • Rack design tools optimized for AV equipment not generic electrical panels

  • Cable documentation recognizing AV-specific connectors and signal types

  • BOM structures aligning with AV procurement practices

This AV-centric design eliminates the workarounds and adaptations required when using tools built for other industries.

Comprehensive Equipment Database

X-DRAW’s access to 1.5+ million products from 5,200+ brands represents the most extensive AV equipment library available—rivaling or exceeding even premium paid platforms. This comprehensive coverage ensures designers can document virtually any commercial AV installation without manually maintaining custom libraries.

The database includes current manufacturer part numbers, accurate specifications, and up-to-date product information maintained through manufacturer partnerships—not user submissions that quickly become outdated.

Modern Cloud Architecture

X-DRAW’s cloud-native design positions it ahead of legacy desktop platforms struggling to retrofit collaboration features. The platform naturally supports:

  • Real-time multi-user collaboration enabling simultaneous editing

  • Universal device access from desktops, laptops, tablets, and smartphones

  • Automatic version control and backup protection

  • Instant sharing without file transfers or email attachments

  • Zero IT infrastructure requirements or maintenance burdens

This modern approach aligns with 2026 work patterns where distributed teams, remote work, and mobile field access are standard expectations not special accommodations.

Integrated Documentation Workflow

X-DRAW connects rack design, signal diagramming, cable documentation, and BOM generation within unified workflows. When equipment selections change, updates propagate through all related documentation automatically—eliminating the manual coordination plaguing disconnected tools.

This integration ensures consistency between documents while dramatically reducing the time required to maintain accurate project documentation as designs evolve.

Continuous Platform Evolution

XTEN-AV consistently enhances X-DRAW with new features, expanded equipment libraries, and workflow improvements. Recent additions include:

  • AI-powered equipment recommendations suggesting appropriate products

  • Enhanced mobile interfaces optimized for tablet field use

  • Improved floor plan integration with architectural drawings

  • Advanced sharing options for client collaboration

  • Expanded export formats supporting diverse workflows

This commitment to ongoing development ensures X-DRAW remains competitive with commercial alternatives despite its free pricing.

Intelligent Design Assistance

Artificial intelligence integration represents the most significant evolution in schematic CAD software in 2026. AI-powered platforms now provide capabilities that fundamentally change how AV professionals approach system design:

Equipment Recommendation Engines analyze project requirements and suggest appropriate products. Rather than manually researching specifications across dozens of manufacturers, designers receive curated recommendations matching performance needs, budget targets, and compatibility requirements.

Automatic Layout Optimization generates efficient rack configurations from equipment lists. AI algorithms consider thermal management, weight distribution, serviceability, and aesthetic presentation—producing optimized layouts faster than human designers while adhering to best practices.

Design Validation identifies potential problems before they impact projects. Machine learning models trained on thousands of successful installations recognize problematic patterns—like insufficient cooling, overloaded power circuits, or incompatible signal formats—and alert designers to issues requiring attention.

Cable Path Prediction suggests optimal routing from source to destination considering physical constraints, signal requirements, and installation practicality. This guidance improves installation efficiency and reduces wiring errors.

Natural Language Design

AI-powered platforms increasingly support natural language interfaces allowing designers to describe requirements in plain English rather than navigating complex menus:

“Create a corporate boardroom system with wireless presentation, dual 75-inch displays, ceiling microphones, and a 10-channel DSP”

The AI interprets this description, suggests appropriate equipment, generates preliminary rack layouts, and creates initial signal flow diagrams—providing starting points designers refine rather than creating from scratch.

This capability dramatically accelerates initial design phases while making CAD tools accessible to less technically experienced team members.

Predictive Maintenance Integration

Forward-looking AI systems connect design documentation with equipment monitoring to predict service needs. Cloud platforms tracking installed system performance can:

  • Alert integrators when usage patterns suggest preventive maintenance opportunities

  • Identify equipment nearing end-of-life based on operational hours

  • Recommend upgrades when newer products offer significant improvements

  • Schedule service proactively before failures occur

This predictive capability transforms AV integration from reactive service to proactive partnership, creating recurring revenue opportunities while improving client satisfaction.

Learning and Improvement

AI-powered platforms continuously improve through machine learning. As thousands of AV professionals use these tools, the systems:

  • Learn which equipment combinations work well together

  • Identify design patterns correlating with successful installations

  • Recognize configurations prone to problems

  • Suggest improvements based on accumulated experience

This collective intelligence means every user benefits from the community’s aggregate knowledge—a fundamental advantage over static software that never improves beyond developer programming.

Future AI Capabilities

Emerging AI technologies promise even more transformative capabilities:

Automated As-Built Documentation could use photos or videos of installed systems to automatically update design documents, eliminating manual as-built creation.

Voice-Activated Design might enable hands-free diagram creation and modification, particularly valuable for field technicians documenting existing systems.

Augmented Reality Integration could overlay design documentation onto physical spaces through AR headsets, helping installers visualize planned configurations before installation begins.

Generative Design might evaluate thousands of potential configurations to identify optimal solutions considering multiple competing objectives—performance, cost, aesthetics, installation complexity, and maintenance requirements.

What is schematic CAD software for AV integration?

Schematic CAD software for AV integration consists of specialized computer-aided design tools that enable audiovisual professionals to create detailed technical documentation for AV system installations. These platforms provide capabilities specifically designed for AV applications including rack elevation design, signal flow diagramming, cable schedule generation, bill of materials creation, and equipment library access.

Unlike general-purpose CAD programs, AV-specific schematic software understands unique requirements of audiovisual systemssignal routing, connector compatibility, rack unit calculations, and AV equipment specifications—automating tasks that would require extensive manual work in generic drawing tools.

Quality schematic CAD platforms streamline workflows from initial system design through installation documentation and as-built records, ensuring consistent, accurate technical drawings that reduce errors and accelerate project execution.

Do I need expensive CAD software for AV system design?

No. While premium CAD platforms offer advanced capabilities valuable for specific applications, most AV integration companies find free or moderate-cost software completely adequate for typical commercial installations.

XTEN-AV X-DRAW demonstrates that professional-grade AV design capabilities—including comprehensive equipment libraries, automated documentation generation, and cloud collaboration—are available at zero cost. This free platform provides everything most integration projects require without compromising documentation quality or workflow efficiency.

Expensive CAD software like AutoCAD Electrical or EPLAN becomes justified primarily for:

  • Large enterprise companies requiring integration with existing business systems

  • Complex projects needing BIM coordination or multi-discipline collaboration

  • Specialized applications like critical infrastructure or broadcast facilities

  • Organizations already standardized on specific CAD ecosystems

For small to mid-sized integration companies focused on commercial AV work, free or affordable cloud-based platforms typically represent optimal choices.

What’s the difference between free and paid schematic CAD software?

The difference between free and paid schematic CAD software has narrowed dramatically in 2026. Modern free platforms like XTEN-AV X-DRAW now provide professional capabilities that match or exceed many paid alternatives for typical AV integration requirements.

Key distinctions that still differentiate premium platforms:

Advanced Specialized Features: Paid software may offer sophisticated capabilities like acoustic modeling, video wall bezel compensation, network bandwidth analysis, or DSP configuration integration that justify costs for specific project types.

Enterprise Integration: Premium platforms often integrate more deeply with business systemsERP software, CRM platforms, project management tools, and accounting systems—valuable for large organizations with complex workflows.

Dedicated Support: Paid software typically includes professional technical support with guaranteed response times, while free platforms may offer community-based support or limited assistance.

Customization Options: Enterprise tools often provide API access, scripting capabilities, or custom module development supporting unique company workflows.

However, for core AV documentation tasks—rack design, signal diagramming, cable schedules, and BOM generation—quality free platforms now deliver professional results without functional compromises.

Can cloud-based schematic CAD software work offline?

Most cloud-based schematic CAD platforms require active internet connections for full functionality, though capabilities vary by specific software:

Online-Only Platforms like AVSnap and XTEN-AV X-DRAW currently require internet connectivity for access. These platforms store all data in the cloud and run application code through web browsers, making offline operation impossible.

Hybrid Platforms like D-Tools Cloud combine cloud features with downloadable desktop applications that can work offline with previously synced projects. Changes made offline synchronize when connectivity returns.

Progressive Web Apps (PWAs) represent emerging technology allowing some cloud software to function offline with limited capabilities through browser caching and local storage.

The reality in 2026 is that reliable internet connectivity is nearly ubiquitous—available through cellular hotspots even in locations lacking wired connections. The benefits of cloud architectureautomatic backups, real-time collaboration, universal access, and automatic updates—typically outweigh occasional connectivity limitations.

For teams concerned about offline access, strategies include:

  • Export important documents to PDF before site visits

  • Use mobile hotspots for connectivity in remote locations

  • Choose hybrid platforms offering offline capabilities

  • Maintain desktop software as backup for critical situations

How long does it take to learn schematic CAD software?

Learning timelines for schematic CAD software vary dramatically based on platform complexity and user background:

Purpose-Built AV Platforms like XTEN-AV X-DRAW or AVSnap with intuitive interfaces typically enable competent usage within 1-2 days of exploration. Experienced AV professionals familiar with system design concepts can often create useful documentation within hours of initial platform exposure. Full feature mastery typically occurs within 2-3 weeks of regular use.

General-Purpose CAD Software like AutoCAD Electrical or Vectorworks requires substantially more training investment. New users without prior CAD experience might need 2-4 weeks of dedicated training before achieving basic proficiency, with full capability development extending over several months of regular practice.

Comprehensive Platforms like D-Tools SI fall in the middle, typically requiring 1-2 weeks of training to understand core features and 4-8 weeks of project work to develop comfortable proficiency across the entire platform.

Prior Experience significantly affects learning curves:

  • CAD veterans adapt to new platforms much faster than first-time users

  • AV professionals grasp AV-specific tools more quickly than general drafting software

  • Younger workers often adopt new software faster through digital native comfort

Training investment should be considered when selecting platforms. Steep learning curves consume valuable time and reduce productivity during transition periods—costs that may exceed apparent software savings when comparing expensive platforms with gentle learning curves against cheaper alternatives requiring extensive training.

Is free schematic CAD software suitable for professional AV integration?

Absolutely. Free schematic CAD software like XTEN-AV X-DRAW is not only suitable but often optimal for professional AV integration work. The platform provides:

  • Professional-quality documentation indistinguishable from paid software outputs

  • Comprehensive equipment libraries exceeding many commercial alternatives

  • Automated features reducing manual work and errors

  • Cloud collaboration supporting modern distributed workflows

  • Regular updates maintaining platform currency

  • Zero licensing costs improving profitability

The misconception that “professional” requires “expensive” no longer reflects CAD software reality in 2026. Modern free platforms deliver capabilities that small and mid-sized integration companies need without artificial limitations or compromised functionality.

Professional suitability depends on:

  • Documentation quality: Does output meet client and regulatory expectations?

  • Feature completeness: Can the platform handle project requirements?

  • Workflow efficiency: Does software accelerate or hinder productivity?

  • Reliability: Is the platform stable and consistently available?

  • Support quality: Can users get help when needed?

XTEN-AV X-DRAW and similar modern free platforms satisfy these criteria for the vast majority of commercial AV projects, making them genuinely professional tools regardless of zero cost.

Expensive specialized software remains justified for edge cases—extremely complex systems, unique integration requirements, or specific client mandates—but represents unnecessary expense for most integration work.

What features should I prioritize when choosing schematic CAD software?

Priority features depend on your specific situation, but most AV integrators should emphasize:

Equipment Library Depth: Comprehensive, current product databases from manufacturers you regularly specify dramatically accelerate design and ensure specification accuracy. XTEN-AV X-DRAW’s 1.5+ million product library exemplifies this priority.

Automated Documentation: Cable schedule generation, BOM creation, and label automation eliminate tedious manual tasks, reducing errors while accelerating project completion.

Cloud Collaboration: In 2026, distributed teams and mobile workflows make cloud-based architecture increasingly essential for efficient operations.

Intuitive Interface: Platforms with gentle learning curves enable faster adoption and broader team utilization. Time spent navigating complex menus is time not spent producing billable work.

AV-Specific Design: Purpose-built AV tools understand signal routing, equipment mounting, and connector compatibility in ways generic CAD software doesn’t, providing automation and validation unavailable in general-purpose platforms.

Integration Capabilities: Consider how schematic software connects with other tools you use—quoting systems, project management platforms, accounting software, or BIM coordination.

Total Cost: Evaluate complete investment including licensing, training, support, and productivity impacts—not just sticker price.

Different company sizes and project types may shift these priorities, but these represent core considerations for most AV professionals.

The landscape of schematic CAD software for AV system design in 2026 offers unprecedented choices spanning free cloud-based platforms to enterprise-grade engineering tools. This diversity ensures every AV integrator—regardless of company size, project complexity, or budget constraints—can access professional design capabilities that enhance documentation quality, accelerate workflows, and reduce costly errors.

XTEN-AV X-DRAW emerges as the clear leader for cost-conscious integration companies, delivering comprehensive AV-specific features, extensive equipment libraries, and modern cloud collaboration without licensing fees. This free platform demonstrates that professional capability no longer requires substantial software investment, democratizing access to tools that previously cost thousands of dollars annually.

Premium platforms like D-Tools System Integrator, AutoCAD Electrical, and ConnectCAD remain relevant for specific scenarios—enterprise integration, BIM coordination, lifecycle management, or multi-discipline projects—where advanced capabilities justify their costs. These specialized tools serve important niches within the broader AV integration ecosystem.

The emergence of AI-powered design assistance represents the most significant evolution in schematic CAD software, with intelligent automation, natural language interfaces, and predictive capabilities fundamentally changing how AV professionals approach system design. Early adopters of AI-enhanced platforms position themselves for competitive advantages as these technologies mature.

Choosing optimal schematic CAD software requires honest assessment of your specific needs, careful evaluation of feature requirements against actual project demands, and realistic analysis of total costs including training, support, and productivity impacts. The “best” solution varies by situation—what works perfectly for one company may be inappropriate for another.

However, one conclusion emerges clearly: every AV integrator in 2026 should be using purpose-built schematic CAD software rather than generic drawing tools or manual documentation methods. The efficiency gains, error reductions, and professional presentation improvements delivered by modern AV design platforms directly impact profitability and competitive positioning in ways that quickly justify even significant software investments—and when professional tools are available free, the decision becomes remarkably simple.

The future of AV system design is digital, collaborative, intelligent, and increasingly accessible. Integration companies embracing these modern tools position themselves for success in an industry where documentation quality, workflow efficiency, and professional presentation increasingly differentiate winners from competitors struggling with outdated methods.

PakarPBN

A Private Blog Network (PBN) is a collection of websites that are controlled by a single individual or organization and used primarily to build backlinks to a “money site” in order to influence its ranking in search engines such as Google. The core idea behind a PBN is based on the importance of backlinks in Google’s ranking algorithm. Since Google views backlinks as signals of authority and trust, some website owners attempt to artificially create these signals through a controlled network of sites.

In a typical PBN setup, the owner acquires expired or aged domains that already have existing authority, backlinks, and history. These domains are rebuilt with new content and hosted separately, often using different IP addresses, hosting providers, themes, and ownership details to make them appear unrelated. Within the content published on these sites, links are strategically placed that point to the main website the owner wants to rank higher. By doing this, the owner attempts to pass link equity (also known as “link juice”) from the PBN sites to the target website.

The purpose of a PBN is to give the impression that the target website is naturally earning links from multiple independent sources. If done effectively, this can temporarily improve keyword rankings, increase organic visibility, and drive more traffic from search results.
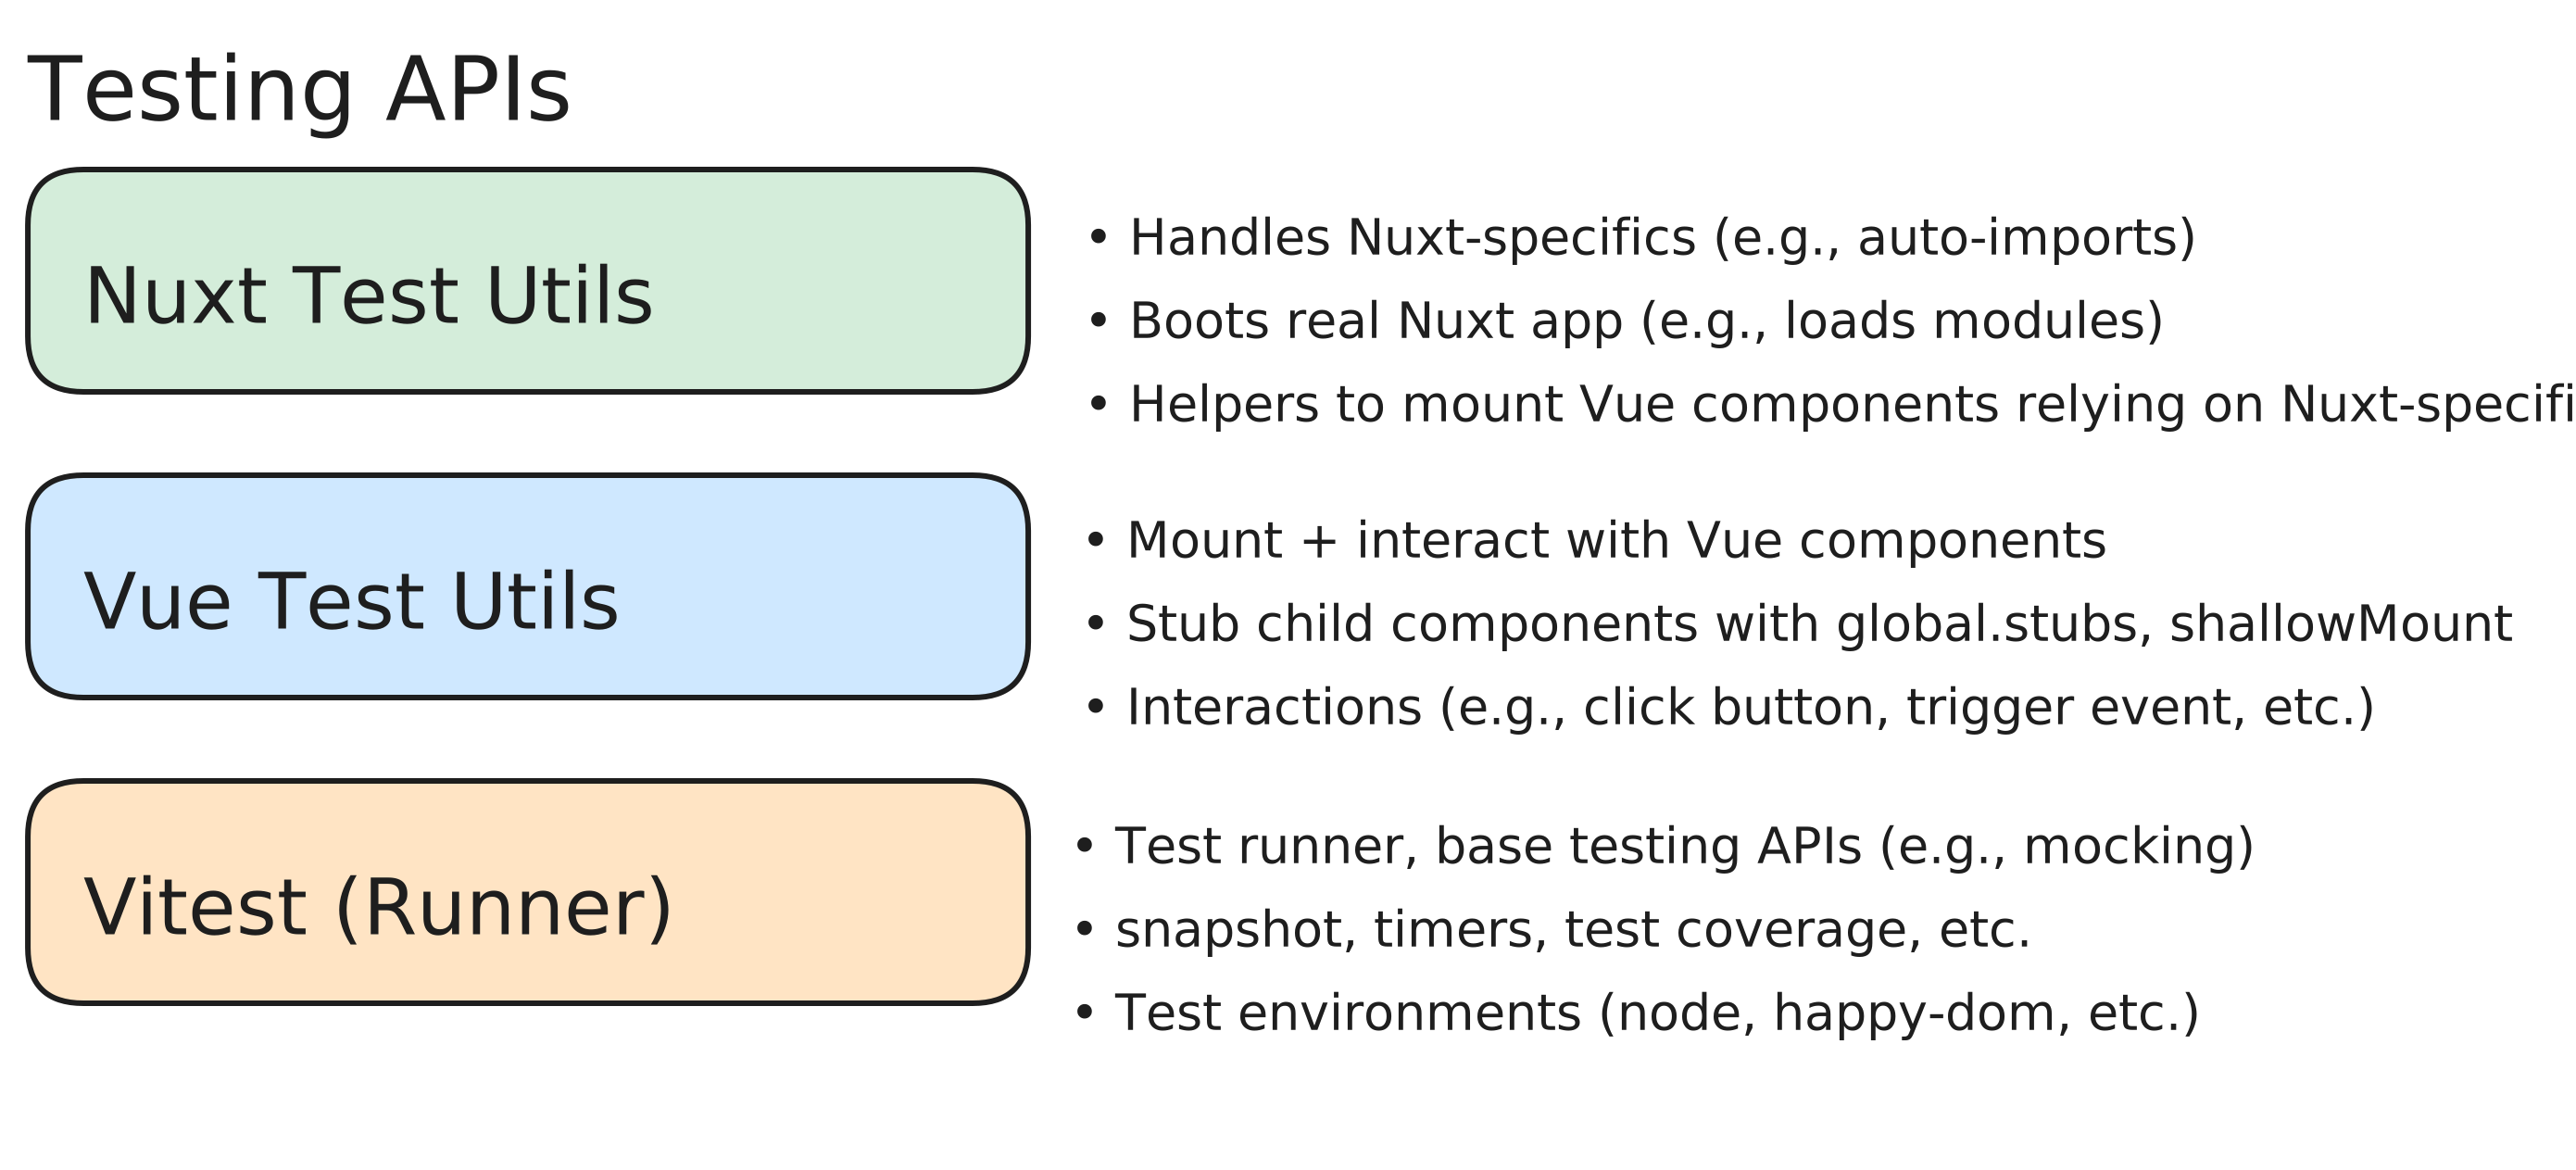
Jasa Backlink

Download Anime Batch

July 1, 2026 at 11:37 am, No comments In the rapidly evolving audiovisual integration landscape of 2026, schematic CAD software has become the cornerstone of successful AV system design and project documentation. As AV integrators, system designers, and consultants face increasingly complex commercial AV installations—from intelligent building systems to immersive collaboration spaces—the ability to create precise technical drawings, rack elevation